분류 전체보기 (356)

💻 Programming/Oracle 11g

ORA-00917: 누락된 콤마

말그대로 콤마가 누락되었다는 얘기다.  

하지만!!!!! 때로는 엉뚱한 실수에 엉뚱한 오류가 나기도 한다.


내가 저 에러메시지를 본것은 아래와 같은 설정을 했을때다.

스프링 기반 웹앱을 만들고 xml파일에 쿼리문을 넣었는데....


================================================ 

<insert id="add">
        insert into
            테이블명
        values(
            column1 = #{col1, jdbcType=VARCHAR}
            ,​column2 = #{col2, jdbcType=VARCHAR}
            ,​column3 = #{col3, jdbcType=VARCHAR}
        )
</insert> 

================================================

자, 여기서 테이블명과 컬럼명은 임의로 써넣었다. 물론 실제 소스에서는 실제 테이블명과 컬럼명이 들어가있다. 이 테이블에는 세개의 컬럼( column1, column2, column3 )이 있다고 가정한다. 


이 코드에서 왜 누락된 콤마 누락 에러가 발생했는지 찾았는가???


이 코드에는 콤마가 누락된 것이 아니다. Insert 문의 형식자체가 틀렸다.

위 코드는 아래와 같이 바뀌어야 한다.


        insert into
            테이블명
        values(
            #{col1, jdbcType=VARCHAR}
            ,​#{col2, jdbcType=VARCHAR}
            ,​#{col3, jdbcType=VARCHAR}
        ) 


에러메시지만보고 콤마가 어디가 누락됐다는거지? 라는 생각을 가지고 오류를 찾으려한다면 하루종일을 허비해도 못찾을 것이다.


당신의 지식에 조금이나마 도움이 됐기를 바라며 글을 마친다.... 


아래 예제는 JMNote.com의 위키페이지에서 복사해온 것임을 밝힙니다.

( 원본 주소 - 

http://jmnote.com/wiki/%EC%98%A4%EB%9D%BC%ED%81%B4_%EC%BB%AC%EB%9F%BC%EB%AA%85_%EC%88%9C%EC%84%9C_%EB%B3%80%EA%B2%BD

실습 테이블 생성

CREATE TABLE employee (
emp_no NUMBER PRIMARY KEY,
dept VARCHAR2 (16),
name VARCHAR2 (32)
);
INSERT INTO employee VALUES (130001, '인사부', '홍길동');
INSERT INTO employee VALUES (130002, '영업부', '임꺽정');
INSERT INTO employee VALUES (130003, '생산부', '장길산');

변경 전

SELECT * FROM employee;
EMP_NO  DEPT    NAME
130001  인사부       홍길동
130002  영업부       임꺽정
130003  생산부       장길산

변경

  • 재배열된 사본 생성 → 사본을 원본으로 대체
CREATE TABLE temp AS SELECT emp_no, name, dept FROM employee;
DROP TABLE employee;
RENAME temp TO employee;

변경 후

SELECT * FROM employee;
EMP_NO  NAME    DEPT
130001  홍길동       인사부
130002  임꺽정       영업부
130003  장길산       생산부


오라클에서 테이블에 새로운 PRIMARY KEY를 추가하고 이를 FK로 만들어주고 싶었다.

그러다가 그만 ORA-02270 에러를 만나게 되었다.

만나게 된 상황은 이렇다.


테이블 A와 B가 있다.

테이블 A는 a라는 PK가 있고 테이블 B는 (a, b)를 복합PK로 가지고 있었다.

자, 여기서 A와 B테이블에 컬럼c를 추가하고 복합PK로 만들어주려했다.

즉, A의 PK는 (a, c), 그리고 B의 PK는 (a, b, c)가 되는것이다. 그리고 B의 a, c는 FK로 A의 a, c를 참조해야한다.


이를 하기위해서 생각했던 순서는 아래와 같다. 


1. 테이블 A, B의 PK를 DROP한다.

2. 테이블 A, B에 컬럼c를 추가한다.

3. 테이블 A의 PK로 (a, c)를 선언한다. 

3. 테이블 B의 a를 FK로 선언하면서 A의 a를 참조하도록 한다.

 - alter table B add foreign key (a) references A(a);

4. 테이블 B의 c를 FK로 선언하면서 A의 c를 참조하도록 한다.

 - alter table B add foreign key (c) references A(c);

5. 테이블 B의 PK로 (a, b, c)를 선언한다.


하지만 3번에서 02270 에러를 만나게 되었다.

이 에러는 UNIQUE KEY나 PK가 아닌것을 참조하려고 했기 때문에 발생하는 에러이다.

그래서 생각해보니 테이블 A의 PK는 a나 c가 아닌 (a, c)인 것이다.

하여 3, 4번 과정을 묶어서 테이블 B의 FK로 B의 (a, c)가 A의 (a, c)를 참조하도록 설정하였더니 문제가 해결되었다.

 - alter table B add foreign key (a, c) references A(a, c);


💻 Programming/Oracle 11g

[SQL] Truncate vs Drop vs Delete

DELETE

The DELETE command is used to remove rows from a table. A WHERE clause can be used to only remove some rows. If no WHERE condition is specified, all rows will be removed. After performing a DELETE operation you need to COMMIT or ROLLBACK the transaction to make the change permanent or to undo it. Note that this operation will cause all DELETE triggers on the table to fire.


TRUNCATE

TRUNCATE removes all rows from a table. The operation cannot be rolled back and no triggers will be fired. As such, TRUCATE is faster and doesn't use as much undo space as a DELETE.


DROP

The DROP command removes a table from the database. All the tables' rows, indexes and privileges will also be removed. No DML triggers will be fired. The operation cannot be rolled back.  


* DROP and TRUNCATE are DDL commands, whereas DELETE is a DML command. Therefore DELETE operations can be rolled back (undone), while DROP and TRUNCATE operations cannot be rolled back.


ALTER TABLE [DB명] MODIFY([컬럼명] NOT NULL);


간단하다!!!!!!!!!!


화이팅!!! 


오라클에서 한번에 여러개의 레코드를 insert하려면 아래와 같은 방식을 사용할 수 있다.


INSERT ALL
INTO 테이블명 ( column_1, column_2 ) VALUES ( value_1,  value_2)

INTO 테이블명 ( column_1, column_2 ) VALUES ( value_3,  value_4)

SELECT 1 FROM DUAL


💻 Programming/Oracle 11g

[SQL] COUNT(*) 와 COUNT(1)

SQL에서 특정 데이타의 개수를 뽑아낼 때 사용하는 COUNT()함수가 있다.

뭐 데이터의 양이 적은 경우에는 속도차이를 느끼지 못하겠지만 데이터의 양이 많은 DB를 사용하는 경우에는 어떨까...????하는 의문이 생긴다.


아직 확실한 테스트를 해보지는 않았다. 그저 인터넷에서 찾은 정보에 의하면....


영어에 약한분들은 Example부분은 그냥 건너뛰고 Tip: Performance......부분을 보면된다. 

================================================================= 

Example - Using SQL GROUP BY Clause

In some cases, you will be required to use the SQL GROUP BY clause with the SQL COUNT function.

For example, you could use the SQL COUNT function to return the name of the department and the number of employees (in the associated department) that make over $25,000 / year.

SELECT department, COUNT(*) AS "Number of employees"
FROM employees
WHERE salary > 25000
GROUP BY department;

Because you have listed one column in your SQL SELECT statement that is not encapsulated in the SQL COUNT function, you must use the SQL GROUP BY clause. The department field must, therefore, be listed in the GROUP BY section.

TIP: Performance Tuning with SQL COUNT

Since the SQL COUNT function will return the same results regardless of what NOT NULL field(s) you include as the SQL COUNT function parameters (ie: within the brackets), you can change the syntax of the SQL COUNT function to COUNT(1) to get better performance as the database engine will not have to fetch back the data fields.

For example, based on the example above, the following syntax would result in better performance:

SELECT department, COUNT(1) AS "Number of employees"
FROM employees
WHERE salary > 25000
GROUP BY department;

Now, the SQL COUNT function does not need to retrieve all fields from the employees table as it had to when you used the COUNT(*) syntax. It will merely retrieve the numeric value of 1 for each record that meets your criteria.

======================================================================== 


출처 :Http://www.techonthenet.com/sql/count.php


java.lang.SecurityException: Sealing violation exception (ID 6554602)

Description

Starting with JDBC 10.2 drivers, having more than one JDBC jar file in the CLASSPATH may result in a java.lang.SecurityException: Sealing violation exception.

Detailed explanation from Oracle is documented in the following Oracle Document ID:

Note:405446.1
Subject: JDBC Driver 10.2 Uses Sealed JAR files and May Cause SecurityException Sealing Violation

Solution

(Suggested by Oracle) Make sure that the CLASSPATH includes only one JDBC driver JAR file.

=============================================================================


💻 Programming/Oracle 11g

[SQL] CONNECT BY , START WITH

계층 구조를 가진 데이타를 뽑아보자!!!!

한 테이블 Table_1이 있다.

이 테이블은 objectID필드와 parentObjectID 필드를 갖고 있다.

두 필드에는 OBJECT_X(X는 정수형 숫자)형식의 데이터가 들어있다. 

또, OBJECT_1이 하위 OBJECT_2를 가지고 OBJECT_2가 또 하위 OBJECT_3을 가진다고 가정하자. (OBJECT_2는 OBJECT_1의 자식 OBJECT라고 생각하면된다.)

여러 다른 OBJECT_X 형식의 데이터들이 테이블 내에 많이 있다고 가정하자.


이때 CONNECT BY와 START WITH를 이용하여 OBJECT_2와 그 상위, 또 그 상위, 또 그 상위...쭈우욱 해서 OBJECT_2를 갖는 최상위 OBJECT까지 계층구조로 뽑아내기 위해서는 아래와 같이 하면 된다.


SELECT *

FROM Table_1

CONNECT BY PRIOR objectID = parentObjectID

START WITH objectID = 'OBJECT_2'


------- 

 파란색 조건부의 순서가 바뀌면 결과도 바뀌므로 주의하자.!!!!


SQL 쿼리에서 결과로 리스트가 나왔을 때 이 리스트들을 한줄(1 row)로 합쳐서 보여주고 싶다면!!!!!

LISTAGG를 사용하자!! 

SELECT LISTAGG(last_name, '; ')
         WITHIN GROUP (ORDER BY hire_date, last_name) "Emp_list",
       MIN(hire_date) "Earliest"
  FROM employees
  WHERE department_id = 30;

Emp_list                                                     Earliest
------------------------------------------------------------ ---------
Raphaely; Khoo; Tobias; Baida; Himuro; Colmenares            07-DEC-02


💻 Programming/Oracle 11g

[SQL] 조인(join)에 관하여

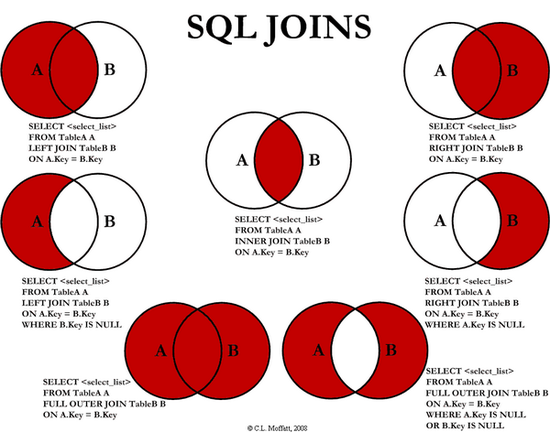
SQL join을 할 경우 어떠한 결과가 나올지 예상을 하고서 쿼리문을 작성을 해야한다.

join의 종류가 많기 때문에 이해하기가 힘든 분들을 위해서 인터넷에 돌아다니는 사진을 하나 첨부해보았다. 두 테이블을 조인했을 때 어떠한 결과가 나오는지 그림으로 쉽게 설명해놓은 사진이다.


💻 Programming/Oracle 11g

락걸린 세션 죽이기

ORA-00031: session marked for kill

아래 링크로 가보자.

Check the link below.


https://blog.tanelpoder.com/2009/08/13/alter-system-kill-session-and-ora-00031-session-marked-for-kill/ 


💻 Programming/Oracle 11g

[SQL] where 1=1 은 왜 사용하는가?

간단히 말하자면 동적 쿼리를 사용할 시에 조건문을 줄이기 위해서이다.

select * from table1; 이라는 쿼리와 select * from table1 where 1=1;이라는 쿼리의 결과는 동일하다.

하지만 동적 쿼리를 사용해서 조건절에 또다른 조건은 줘야하는 경우에는 후자가 더 좋다.

왜???

첫번째 쿼리에 조건을 더하려면 우선 where가 있는지를 검사를 해주고 조건을 더해주어야 하지만

두번째 쿼리에 조건을 더할때는 무조건 and로 시작하는 조건을 넣어주면 되기 때문이다.


예를들어 location='Seoul'이라는 조건을 덧붙여 줘야한다고 가정하자.

첫번째 쿼리에 저 조건을 붙이려면 우선 if문을 써서 쿼리에 where절이 있는지 검사를 해줘야 하지만

두번째 쿼리에 붙이려면 그냥 sql += "and location=\'Seoul\'" 이런식으로 쓰면 되기 때문이다. 


00984. 00000 -  "column not allowed here"


문제가 된 SQL문 

insert into tablename(field1, FIELD2, FIELD3, FIELD4, FIELD5) values("a","b","c","d",null);


해결한 SQL문 

insert into tablename(field1, FIELD2, FIELD3, FIELD4, FIELD5) values('a','b','c','d',null);


varchar2 타입의 데이터가 들어가야 할 자리에 스트링을 넣어준다고 더블 quotation mark를 썼다가 저런 에러를 보았다. 간단히 싱글 quotation mark로 바꿔주면 문제 해결!!! 


아래 내용은 타 블로그에서 퍼온것입니다.
저는 CentOS 6.4 / Oracle 11g에 적용해봤는데 아무 문제없이 잘 되었습니다.


환경
Cent OS 5.5 / Oracle 10g

------------------------------------------------------------------------------

1. 캐릭터셋 확인 

SELECT * FROM sys.props$ where name='NLS_CHARACTERSET';


2. 프로파일 수정

export NLS_LANG=KOREAN_KOREA.UTF-8 
export NLS_LANG=KOREAN_KOREA.KO16MSWIN949 


3. 캐릭터셋 변경

C:\>sqlplus /nolog; 
sql>conn /as sysdba; 


변경하고자하는 캐릭터셋을 수정

== UTF-8 == 
sql> update sys.props$ set value$='UTF8' where name='NLS_CHARACTERSET'; 
sql> update sys.props$ set value$='UTF8' where name='NLS_NCHAR_CHARACTERSET'; 
sql> update sys.props$ set value$='KOREAN_KOREA.UTF8' where name='NLS_LANGUAGE'; 

= KO16MSWIN949 = //한글확장 
sql> update sys.props$ set value$='KO16MSWIN949' where name='NLS_CHARACTERSET'; 
sql> update sys.props$ set value$='KO16MSWIN949' where name='NLS_NCHAR_CHARACTERSET'; 
sql> update sys.props$ set value$='KOREAN_KOREA.KO16MSWIN949' where name='NLS_LANGUAGE'; 
sql> commit; 


재시작

sql> shutdown immediate; 
sql> startup mount; 
sql> alter system enable restricted session; 
sql> alter system set job_queue_processes=0; 
sql> alter system set aq_tm_processes=0; 
sql> alter database open; 
sql> alter database character set UTF8; 
or alter database character set KO16MSWIN949; 
sql> shutdown immediate; 
sql> startup; 


출처 : http://algina.tistory.com/41

💻 Programming/Oracle 11g

[오라클/oracle11g] dump 함수

출처 : http://www.techonthenet.com/oracle/functions/dump.php


Oracle/PLSQL: DUMP Function

This Oracle tutorial explains how to use the Oracle/PLSQL DUMP function with syntax and examples.

Description

The Oracle/PLSQL DUMP function returns a varchar2 value that includes the datatype code, the length in bytes, and the internal representation of the expression.

Syntax

The syntax for the Oracle/PLSQL DUMP function is:

DUMP( expression, [return_format], [start_position], [length] )

Parameters or Arguments

expression is the expression to analyze.

return_format is optional. It determines the format of the return value. This parameter can be any of the following values:

ValueExplanation
8octal notation
10decimal notation
16hexadecimal notation
17single characters
1008octal notation with the character set name
1010decimal notation with the character set name
1016hexadecimal notation with the character set name
1017single characters with the character set name

start_position and length are optional parameters. They determines which portion of the internal representation to display. If these parameters are omitted, the DUMP function will display the entire internal representation in decimal notation.

Applies To

The DUMP function can be used in the following versions of Oracle/PLSQL:

  • Oracle 12c, Oracle 11g, Oracle 10g, Oracle 9i, Oracle 8i

Example

Let's look at some Oracle DUMP function examples and explore how to use the DUMP function in Oracle/PLSQL.

For example:

DUMP('Tech')
Result: 'Typ=96 Len=4: 84,101,99,104'

DUMP('Tech', 10)
Result: 'Typ=96 Len=4: 84,101,99,104'

DUMP('Tech', 16)
Result: 'Typ=96 Len=4: 54,65,63,68'

DUMP('Tech', 1016)
Result: 'Typ=96 Len=4 CharacterSet=US7ASCII: 54,65,63,68'

DUMP('Tech', 1017)
Result: 'Typ=96 Len=4 CharacterSet=US7ASCII: T,e,c,h'


💻 Programming/Oracle 11g

[오라클/oracle11g] 인코딩 문제

최근에 알게된 지식을 공유하고자 포스팅을 남깁니다.


아래 그림처럼 EUC-KR(MSWIN949)로 인코딩설정이 되어있는 DB에 varchar타입의 컬럼에 한글을 넣어두었습니다.

select dump()를 이용해서 들어가있는 데이타를 헥사값으로 출력해보면 2바이트짜리로 한글이 잘 들어가있음을 확인할 수 있었습니다.

그런데 자바 애플리케이션에서 이 값을 Resultset.getBytes()로 읽어와서 출력해보니 3바이트 UTF-8 인코딩으로 변환이 되어있었습니다.


euc-kr 바이트를 읽어와서 처리를 해야했기 때문에 문제가 생긴 것인데요.


오라클 문서를 찾아봤더니 다음과 같은 부분이 있었습니다.


How JDBC Drivers Perform Globalization Support Conversions

The techniques that the Oracle JDBC drivers use to perform character set conversion for Java applications depend on the character set the database uses. The simplest case is where the database uses the US7ASCII or WE8ISO8859P1 character set. In this case, the driver converts the data directly from the database character set to UTF-16, which is used in Java applications, and vice versa.

If you are working with databases that employ a non-US7ASCII or non-WE8ISO8859P1 character set (for example, JA16SJIS or KO16KSC5601), then the driver converts the data first to UTF-8 (this step does not apply to the server-side internal driver), then to UTF-16. For example, the driver always converts CHAR and VARCHAR2 data in a non-US7ASCII, non-WE8ISO8859P1 character set. It does not convert RAW data.


Note:

The JDBC drivers perform all character set conversions transparently. No user intervention is necessary for the conversions to occur.


오라클 드라이버가 한글을 기본적으로 utf-8 데이타로 변환을 한다는 것이었습니다.

따라서 자바 애플리케이션에서 읽어들일 때 Resulset.getBytes()로 읽어오면 utf-8로 인코딩된 데이타가 나오게 되는 것이죠.


그래서 getBytes()하는 것을 getString()으로 바꾸고 String.getBytes(encoding) 으로 bytes를 읽어오도록 바꿔서 이 문제를 해결했습니다.


Reference : http://docs.oracle.com/cd/B10500_01/java.920/a96654/advanc.htm

출처 : http://www-01.ibm.com/support/docview.wss?uid=swg21222490

참고로  IBM에서 제공하는 힙덤프 분석툴은 이곳에서 다운로드 가능합니다.


MusgGather : Gathering data for OutOfMemoryErrors on AIX®


Problem(Abstract)

If your Java application experiences OutOfMemory(OOM) errors on an AIX® operating system, there are a number of diagnostic data files that are useful for diagnosing the problem. This mustgather document describes about the diagnostic data files to be collected and the procedure to collect the same.

Resolving the problem

The following set of diagnostic data files need to be collected to diagnose an OutOfMemory error in the Java application:
1. Javacores (Multiple javacore files might be required to diagnose native memory issues)
2. Jextracted system cores (At least two system cores might be required to diagnose native memory issues)
3. Heapdumps
4. Snap traces for analyzing native OOM errors
5. Verbose GC logs (native_stderr.log)
6. Process logs (ps)

For these diagnostic data files to be created, check that the system is configured correctly as per setup document.

Please collect the diagnostic data files for an OutOfMemory error in the Java application as per the below steps:

1. Collect the javacore, heap dump and snap trace file generated automatically by Java runtime on an OOM occurrence.

2. For Java heap exhaustion issues, collect the javacore, system core, heap dump and snap trace files generated automatically by using -Xdump option mentioned in setup.

3. For native memory issues, generate at least three Java core, system core, heap dump and snap trace files by using the following command:
kill -3 [PID_of_problem_JVM]

When you observe the application starting to use excessive amounts of memory, start generating these above files at regular intervals.

The time interval between each generation of files depends on how quickly the application encounters native OOM error. For example, if the application takes 30 minutes to produce an native OOM error, issue the kill command at 10-minute intervals.

Please note that all the javacores, system cores, heap dumps and snap traces can be found in the current path and the names of them will follow the below format:
Javacore : javacore.<time stamp>.<id>.txt
Systemcore : core.<time stamp>.<id>.dmp
Snap trace : snap.<time stamp>.<id>.trc
Heap dump : heapdump.<time stamp>.<id>.phd

Run the JExtract tool against the generated system core file using the following command:
<installpath>/jre/bin/jextract [corefile]

Save the resulting archive file, which has a name in the format of core.<time stamp>.<id>.dmp.zip

4. Collect Verbose Garbage Collector data. This data is in the location specified during setup. Alternatively, the data is sent to the stderr output.

5. Collect process size monitoring data. The data is in the location specified during setup.

After collecting all the above diagnostic data files, you can submit them for help with diagnosing the problem.

Additional Information

When diagnosing the native OOM errors deeply, IBM service might ask you to collect additional information as mentioned below:

1. If the problem is suspected to be caused by a leak within the JVM, you can enable the JVM argument: -Xcheck:memory:callsite=<threshold>

This prints an allocation summary for every <threshold> allocations, by tracking calls from the JVM to the operating system memory allocation functions (malloc(), calloc(), free() and so on), along with callsite information showing which area of code requested the memory. Please use this information to track the memory allocated by an area of code that has not been freed, and to monitor how the size of that memory varies over time.

This option writes a summary of all allocations made or freed by the JVM, for every "N" allocations. "N" is typically a number in the range 100000 – 500000.The output of this option is written to stderr.

Please note the below important considerations for using the Xcheck option:
a) Only available on JDK release 5.0 and above
b) Performance can be badly affected if your threshold is set too low
c) Does not track allocations from outside the JVM

2. If the problem is suspected to be caused by Java Class Library (JCL) memory allocations, you can enable the following option:-Dcom.ibm.dbgmalloc=true

3. If operating system level debugging of native memory leaks is required, you can use the debugging extensions of the malloc subsystem of AIX®. For details about using AIX® debugging extensions, see the related information links.

Related information

Native Profiling on AIX

💻 Programming/Computer General

putty 한글 깨짐 현상


 putty에서 기본값으로 SSH 창을 열면 위와 같이 한글이 깨져 나올 수 있다. 이럴 때에 한글이 깨지지 않게 하려면 putty의 문자 집합(character set) 설정을 손보아야 한다.


먼저 locale 명령으로 SSH에서 쓰이는 부호 종류를 살핀다. 여기에서는 UTF-8이 쓰이고 있다.


 putty 설쩡에서 Window → Translation으로 들어가면 문자 집합 설정이 보인다. 기본값인 'Use font encoding'을 앞에서 본 UTF-8로 바꾼다.


이 설정을 기본값으로 두고 싶다면 Session 항목에서 Default Settings로 저장(save)한다.


문자 집합 설정이 맞게 되었다면 이처럼 깨지지 않은 한글을 볼 수 있다.


출처 : http://pat.im/860


Mac OS X에서 Eclipse Luna와 Tomcat서버를 연동을 시키고 웹프로젝트를 만들려고 할 때 문제가 발생했다.

이유인즉슨 서버런타임환경의 서버목록에 톰캣이 안나오는 것이다.


해결책은 간단하다.


 Help->Install new software-> Work with : 에다가 http://download.eclipse.org/releases/luna  주소를 치면 아래쪽에 다운로드 가능한 소프트웨어 목록이 쭈우우욱 뜰 것이다.


그러면 제일 밑으로 스크롤해서 Web, XML, Java EE and 어쩌구 ......의 하위목록을 펼쳐보자.

그러면 아래그림처럼 목록이 또 나올 것이다.


자 여기서 JST Server Adapters, JST Server Adapters Extensions, JST Server UI, 그리고
WST Server Adapters 를 선택하자. 아래그림처럼 말이다.


이제 Next 를 클릭하고 라이센스 accept한 뒤 설치를 완료하고 이클립스를 재부팅하면 서버런타임환경에 톰캣이 목록에 뜨는 것을 확인할 수 있을것이다.


노력하는 자에게 기회가 주어지나니~~