๐Ÿ’ป Programming (358)


 putty์—์„œ ๊ธฐ๋ณธ๊ฐ’์œผ๋กœ SSH ์ฐฝ์„ ์—ด๋ฉด ์œ„์™€ ๊ฐ™์ด ํ•œ๊ธ€์ด ๊นจ์ ธ ๋‚˜์˜ฌ ์ˆ˜ ์žˆ๋‹ค. ์ด๋Ÿด ๋•Œ์— ํ•œ๊ธ€์ด ๊นจ์ง€์ง€ ์•Š๊ฒŒ ํ•˜๋ ค๋ฉด putty์˜ ๋ฌธ์ž ์ง‘ํ•ฉ(character set) ์„ค์ •์„ ์†๋ณด์•„์•ผ ํ•œ๋‹ค.


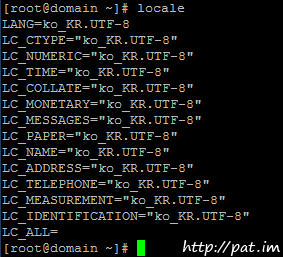
๋จผ์ € locale ๋ช…๋ น์œผ๋กœ SSH์—์„œ ์“ฐ์ด๋Š” ๋ถ€ํ˜ธ ์ข…๋ฅ˜๋ฅผ ์‚ดํ•€๋‹ค. ์—ฌ๊ธฐ์—์„œ๋Š” UTF-8์ด ์“ฐ์ด๊ณ  ์žˆ๋‹ค.


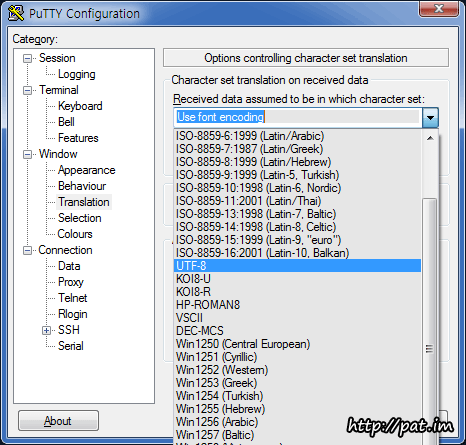
 putty ์„ค์ฉก์—์„œ Window โ†’ Translation์œผ๋กœ ๋“ค์–ด๊ฐ€๋ฉด ๋ฌธ์ž ์ง‘ํ•ฉ ์„ค์ •์ด ๋ณด์ธ๋‹ค. ๊ธฐ๋ณธ๊ฐ’์ธ 'Use font encoding'์„ ์•ž์—์„œ ๋ณธ UTF-8๋กœ ๋ฐ”๊พผ๋‹ค.


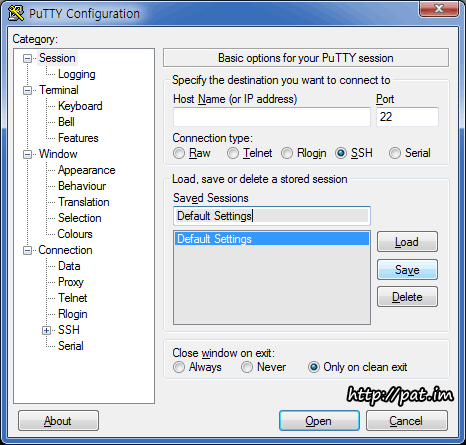
์ด ์„ค์ •์„ ๊ธฐ๋ณธ๊ฐ’์œผ๋กœ ๋‘๊ณ  ์‹ถ๋‹ค๋ฉด Session ํ•ญ๋ชฉ์—์„œ Default Settings๋กœ ์ €์žฅ(save)ํ•œ๋‹ค.


๋ฌธ์ž ์ง‘ํ•ฉ ์„ค์ •์ด ๋งž๊ฒŒ ๋˜์—ˆ๋‹ค๋ฉด ์ด์ฒ˜๋Ÿผ ๊นจ์ง€์ง€ ์•Š์€ ํ•œ๊ธ€์„ ๋ณผ ์ˆ˜ ์žˆ๋‹ค.


์ถœ์ฒ˜ : http://pat.im/860


Mac OS X์—์„œ Eclipse Luna์™€ Tomcat์„œ๋ฒ„๋ฅผ ์—ฐ๋™์„ ์‹œํ‚ค๊ณ  ์›นํ”„๋กœ์ ํŠธ๋ฅผ ๋งŒ๋“ค๋ ค๊ณ  ํ•  ๋•Œ ๋ฌธ์ œ๊ฐ€ ๋ฐœ์ƒํ–ˆ๋‹ค.

์ด์œ ์ธ์ฆ‰์Šจ ์„œ๋ฒ„๋Ÿฐํƒ€์ž„ํ™˜๊ฒฝ์˜ ์„œ๋ฒ„๋ชฉ๋ก์— ํ†ฐ์บฃ์ด ์•ˆ๋‚˜์˜ค๋Š” ๊ฒƒ์ด๋‹ค.


ํ•ด๊ฒฐ์ฑ…์€ ๊ฐ„๋‹จํ•˜๋‹ค.


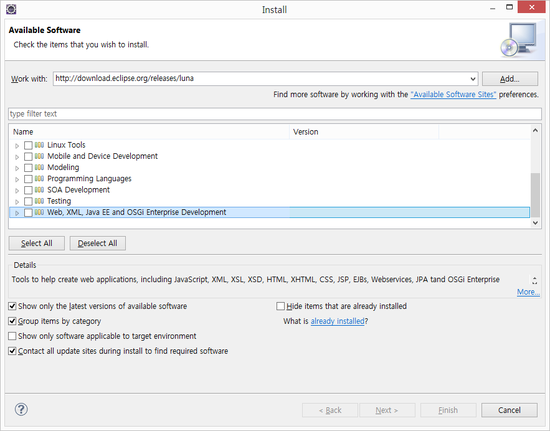
 Help->Install new software-> Work with : ์—๋‹ค๊ฐ€ http://download.eclipse.org/releases/luna  ์ฃผ์†Œ๋ฅผ ์น˜๋ฉด ์•„๋ž˜์ชฝ์— ๋‹ค์šด๋กœ๋“œ ๊ฐ€๋Šฅํ•œ ์†Œํ”„ํŠธ์›จ์–ด ๋ชฉ๋ก์ด ์ญˆ์šฐ์šฐ์šฑ ๋œฐ ๊ฒƒ์ด๋‹ค.


๊ทธ๋Ÿฌ๋ฉด ์ œ์ผ ๋ฐ‘์œผ๋กœ ์Šคํฌ๋กคํ•ด์„œ Web, XML, Java EE and ์–ด์ฉŒ๊ตฌ ......์˜ ํ•˜์œ„๋ชฉ๋ก์„ ํŽผ์ณ๋ณด์ž.

๊ทธ๋Ÿฌ๋ฉด ์•„๋ž˜๊ทธ๋ฆผ์ฒ˜๋Ÿผ ๋ชฉ๋ก์ด ๋˜ ๋‚˜์˜ฌ ๊ฒƒ์ด๋‹ค.


์ž ์—ฌ๊ธฐ์„œ JST Server Adapters, JST Server Adapters Extensions, JST Server UI, ๊ทธ๋ฆฌ๊ณ 
WST Server Adapters ๋ฅผ ์„ ํƒํ•˜์ž. ์•„๋ž˜๊ทธ๋ฆผ์ฒ˜๋Ÿผ ๋ง์ด๋‹ค.


์ด์ œ Next ๋ฅผ ํด๋ฆญํ•˜๊ณ  ๋ผ์ด์„ผ์Šค acceptํ•œ ๋’ค ์„ค์น˜๋ฅผ ์™„๋ฃŒํ•˜๊ณ  ์ดํด๋ฆฝ์Šค๋ฅผ ์žฌ๋ถ€ํŒ…ํ•˜๋ฉด ์„œ๋ฒ„๋Ÿฐํƒ€์ž„ํ™˜๊ฒฝ์— ํ†ฐ์บฃ์ด ๋ชฉ๋ก์— ๋œจ๋Š” ๊ฒƒ์„ ํ™•์ธํ•  ์ˆ˜ ์žˆ์„๊ฒƒ์ด๋‹ค.


๋…ธ๋ ฅํ•˜๋Š” ์ž์—๊ฒŒ ๊ธฐํšŒ๊ฐ€ ์ฃผ์–ด์ง€๋‚˜๋‹ˆ~~

์„ค์น˜๋ฅผ ํ•˜์ง€์•Š๊ณ  ์‚ฌ์šฉํ•  ์ˆ˜ ์žˆ๋Š” ํฌํ„ฐ๋ธ” ๋ฒ„์ „์˜ ํฌ๋กฌ ๋ธŒ๋ผ์šฐ์ €๋ฅผ ๋‹ค์šด๋กœ๋“œ ํ•˜๋Š” ๋ฐฉ๋ฒ•์ž…๋‹ˆ๋‹ค.


1. ์•„๋ž˜ ๋งํฌ๋ฅผ ํ†ตํ•ด์„œ ํฌ๋กฌ ํฌํ„ฐ๋ธ” ๋‹ค์šด๋กœ๋“œ ํŽ˜์ด์ง€๋กœ ์ด๋™ํ•ฉ๋‹ˆ๋‹ค.


http://portableapps.com/apps/internet/google_chrome_portable


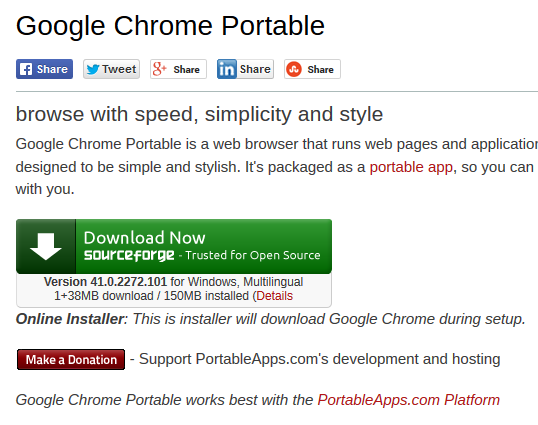
2. ์ด๋™ํ•œ ํŽ˜์ด์ง€์—์„œ ์•„๋ž˜์™€ ๊ฐ™์€ ๋‹ค์šด๋กœ๋“œ ๋ฒ„ํŠผ์„ ์ฐพ์•„์„œ ํด๋ฆญํ•˜๊ณ  exeํŒŒ์ผ์„ ๋‹ค์šด๋กœ๋“œํ•ฉ๋‹ˆ๋‹ค.


3. ๋‹ค์šด๋กœ๋“œ๋ฐ›์€ ์„ค์น˜ํŒŒ์ผ์„ ์‹คํ–‰์‹œํ‚ค๋ฉด ๋งˆ์น˜ ์ธ์Šคํ†จ๋Ÿฌ๋ฅผ ์‹คํ–‰์‹œํ‚จ๊ฒƒ์ฒ˜๋Ÿผ ์ฐฝ์ด ๋œจ์ง€๋งŒ ์‹ค์ œ๋กœ ์„ค์น˜ํ•˜๋Š”๊ฒƒ์ด ์•„๋‹ˆ๋ผ ๊ทธ๋ƒฅ ํฌ๋กฌ ํฌํ„ฐ๋ธ” ๋ฒ„์ „์„ ๋‹ค์šด๋กœ๋“œํ•˜๋Š” ๊ฒƒ์ž…๋‹ˆ๋‹ค. ๊ทธ๋Ÿฌ๋‹ˆ ์•ˆ์‹ฌํ•˜์‹œ๊ณ  "๋‹ค์Œ"์„ ๋ˆ„๋ฅด์‹œ๋ฉด ๋ฉ๋‹ˆ๋‹ค.


4. ๋‹ค์šด๋กœ๋“œ๋ฐ›์€ ํฌ๋กฌ ํฌํ„ฐ๋ธ” ๋ฒ„์ „์„ ์‹คํ–‰์‹œ์ผœ๋ณด์„ธ์š” ^^


Tip. ํฌ๋กฌ๋‚ด์—์„œ ์ด๋Ÿฐ ์ €๋Ÿฐ ์„ค์ •์„ ๋ณ€๊ฒฝํ•˜์‹œ๊ณ  ์‚ฌ์šฉํ•˜์‹œ๋‹ค๊ฐ€ ์—…๋ฐ์ดํŠธ ํ•˜์‹œ๋Š” ๊ฒฝ์šฐ์—๋Š” dataํด๋”์˜ profileํด๋”๋‚ด์˜ ํŒŒ์ผ๋“ค์„ ๋ฐฑ์—…ํ–ˆ๋‹ค๊ฐ€ ์ƒˆ ๋ฒ„์ „์˜ ํฌ๋กฌ ํฌํ„ฐ๋ธ”์„ ๋‹ค์šด๋กœ๋“œ ๋ฐ›์€ ๋’ค์— ๋ฎ์–ด์“ฐ๊ธฐ๋ฅผ ํ•˜์‹œ๋ฉด ๊ธฐ์กด์— ์‚ฌ์šฉํ•˜์‹œ๋˜ ์„ค์ • ํ™˜๊ฒฝ์„ ๊ทธ๋Œ€๋กœ ์žฌ์‚ฌ์šฉํ•˜์‹ค ์ˆ˜ ์žˆ์Šต๋‹ˆ๋‹ค.


vi backup.sh


---------------------------------

#!/bin/sh
USER_ID=myId
PWD=myPwd

FILE_NAME=`ls -lrt /backup/*.gz|tail -1|cut -d ' ' -f 8`                // ํŒŒ์ผ๋ช…์€ ๋ฆฌ๋ˆ…์Šค ๋ช…๋ น์–ด๋ฅผ ์ด์šฉํ•ด์„œ ์ž˜๋ผ๋‚ธ๋‹ค.

ftp -n 192.168.0.100 << SCRIPT
user $USER_ID $PWD
binary

cd /Backup           // ์›๊ฒฉ์ง€์˜ ๋ฐฑ์—…ํด๋” ๊ฒฝ๋กœ
put $FILE_NAME

quit

SCRIPT 

--------------------------------- 

:wq


์ด๋ ‡๊ฒŒ ๋ฐฑ์—…์Šคํฌ๋ฆฝํŠธ๋ฅผ ์ž‘์„ฑ ํ•œ ๋’ค ์Šค์ผ€์ฅด๋Ÿฌ๋ฅผ ์ด์šฉํ•ด์„œ ์ด ์Šคํฌ๋ฆฝํŠธ๋ฅผ ๋งค๋‹ฌ, ๋งค์ฃผ, ํ˜น์€ ๋งค์ผ ๋ฐฑ์—…ํ•˜๋„๋ก ํ•˜๋ฉด ๋œ๋‹ค.


์Šค์ผ€์ฅด๋Ÿฌ๋Š” crond๋ฅผ ์‚ฌ์šฉํ•˜๋ฉด ๋œ๋‹ค. 


๐Ÿ’ป Programming/Linux

vim ๋ช…๋ น์–ด ( vi commands )

< The list of Vim commands >

Working with files
Vim commandAction
:e filenameOpen a new file. You can use the Tab key for automatic file name completion, just like at the shell command prompt.
:w filenameSave changes to a file. If you don't specify a file name, Vim saves as the file name you were editing. For saving the file under a different name, specify the file name.
:qQuit Vim. If you have unsaved changes, Vim refuses to exit.
:q!Exit Vim without saving changes.
:wqWrite the file and exit.
:xAlmost the same as :wq, write the file and exit if you've made changes to the file. If you haven't made any changes to the file, Vim exits without writing the file.
These Vim commands and keys work both in command mode and visual mode.
Vim commandAction
j or Up ArrowMove the cursor up one line.
k or Down ArrowDown one line.
h or Left ArrowLeft one character.
l or Right ArrowRight one character.
eTo the end of a word.
ETo the end of a whitespace-delimited word.
bTo the beginning of a word.
BTo the beginning of a whitespace-delimited word.
0To the beginning of a line.
^To the first non-whitespace character of a line.
$To the end of a line.
HTo the first line of the screen.
MTo the middle line of the screen.
LTo the the last line of the screen.
:nJump to line number n. For example, to jump to line 42, you'd type :42
Inserting and overwriting text
Vim commandAction
iInsert before cursor.
IInsert to the start of the current line.
aAppend after cursor.
AAppend to the end of the current line.
oOpen a new line below and insert.
OOpen a new line above and insert.
CChange the rest of the current line.
rOverwrite one character. After overwriting the single character, go back to command mode.
REnter insert mode but replace characters rather than inserting.
The ESC keyExit insert/overwrite mode and go back to command mode.
Deleting text
Vim commandAction
xDelete characters under the cursor.
XDelete characters before the cursor.
dd or :dDelete the current line.
Entering visual mode
Vim commandAction
vStart highlighting characters. Use the normal movement keys and commands to select text for highlighting.
VStart highlighting lines.
The ESC keyExit visual mode and return to command mode.
Editing blocks of text
Note: the Vim commands marked with (V) work in visual mode, when you've selected some text. The other commands work in the command mode, when you haven't selected any text.
Vim commandAction
~Change the case of characters. This works both in visual and command mode. In visual mode, change the case of highlighted characters. In command mode, change the case of the character uder cursor.
> (V)Shift right (indent).
< (V)Shift left (de-indent).
c (V)Change the highlighted text.
y (V)Yank the highlighted text. In Windows terms, "copy the selected text to clipboard."
d (V)Delete the highlighted text. In Windows terms, "cut the selected text to clipboard."
yy or :y or YYank the current line. You don't need to highlight it first.
dd or :dDelete the current line. Again, you don't need to highlight it first.
pPut the text you yanked or deleted. In Windows terms, "paste the contents of the clipboard". Put characters after the cursor. Put lines below the current line.
PPut characters before the cursor. Put lines above the current line.
Undo and redo
Vim commandAction
uUndo the last action.
UUndo all the latest changes that were made to the current line.
Ctrl + rRedo.
Vim commandAction
/patternSearch the file for pattern.
nScan for next search match in the same direction.
NScan for next search match but opposite direction.
Replace
Vim commandAction
:rs/foo/bar/aSubstitute foo with bar. r determines the range and a determines the arguments.
The range (r) can be
nothingWork on current line only.
numberWork on the line whose number you give.
%The whole file.
Arguments (a) can be
gReplace all occurrences in the line. Without this, Vim replaces only the first occurrences in each line.
iIgnore case for the search pattern.
IDon't ignore case.
cConfirm each substitution. You can type y to substitute this match, n to skip this match, a to substitute this and all the remaining matches ("Yes to all"), and q to quit substitution.
Examples
:452s/foo/bar/Replace the first occurrence of the word foo with bar on line number 452.
:s/foo/bar/gReplace every occurrence of the word foo with bar on current line.
:%s/foo/bar/gReplace every occurrence of the word foo with bar in the whole file.
:%s/foo/bar/giThe same as above, but ignore the case of the pattern you want to substitute. This replaces foo, FOO, Foo, and so on.
:%s/foo/bar/gcConfirm every substitution.
:%s/foo/bar/cFor each line on the file, replace the first occurrence of foo with bar and confirm every substitution.


Reference:

http://www.tuxfiles.org/linuxhelp/vimcheat.html 


.bashrc๋Š” bash์ด ์‹คํ–‰๋  ๋•Œ๋งˆ๋‹ค ์ˆ˜ํ–‰๋˜๊ณ , .bash_profile์€ bash์ด login shell๋กœ ์“ฐ์ผ ๋•Œ(์ฆ‰ ์ฒ˜์Œ loginํ•  ๋•Œ)์— ์ˆ˜ํ–‰๋ฉ๋‹ˆ๋‹ค.


์ถœ์ฒ˜ : https://kldp.org/node/38265

Login Shell vs Non-login Shell

๋จผ์ € 'Login Shell'๊ณผ 'Non-login Shellโ€™ ์„ ๊ตฌ๋ถ„ํ•ด์•ผ ํ•˜๋Š”๋ฐ, ๋กœ๊ทธ์ธ์€ ๊ณ„์ •๊ณผ ์•”ํ˜ธ๋ฅผ ์ž…๋ ฅํ•ด์„œ Shell์„ ์‹คํ–‰ํ•˜๋Š” ๊ฒƒ์ด๋‹ค. ssh๋กœ ์ ‘์†ํ•˜๊ฑฐ๋‚˜ ๋กœ์ปฌ์—์„œ GUI์—์„œ ๋กœ๊ทธ์ธํ•œ๋‹ค๋Š” ์˜๋ฏธ๋‹ค.

โ€˜.profileโ€™, โ€˜.bash_profile'์ด Loginํ•  ๋•Œ ๋กœ๋“œ๋˜๋Š”(source) ํŒŒ์ผ์ด๋‹ค. โ€™.profile'์€ ๊ผญ bash๊ฐ€ ์•„๋‹ˆ๋”๋ผ๋„ ๋กœ๊ทธ์ธํ•˜๋ฉด ๋กœ๋“œ๋˜๊ณ  โ€˜.bash_profile'์€ ๊ผญ Bash๋กœ Loginํ•  ๋•Œ ๋กœ๋“œ๋œ๋‹ค.

๊ทธ๋ฆฌ๊ณ  'Non-login Shell'์€ ๋กœ๊ทธ์ธ ์—†์ด ์‹คํ–‰ํ•˜๋Š” Shell์„ ๋งํ•œ๋‹ค. ssh๋กœ ์ ‘์†ํ•˜๊ณ  ๋‚˜์„œ ๋‹ค์‹œ bash๋ฅผ ์‹คํ–‰ํ•˜๋Š” ๊ฒฝ์šฐ๋‚˜. GUI ์„ธ์…˜์—์„œ ํ„ฐ๋ฏธ๋„์„ ๋„์šฐ๋Š” ๊ฒƒ์ด ์ดํ•ด ํ•ด๋‹นํ•œ๋‹ค. 'sudo bash'๋‚˜ 'suโ€™ ๊ฐ™์€ ๊ฒƒ๋„ ์ด์— ํ•ด๋‹นํ•œ๋‹ค.

โ€˜.bashrc'๋Š” ๋กœ๊ทธ์ธ ์—†์ด Bash๊ฐ€ ์‹คํ–‰๋  ๋•Œ ๋กœ๋“œ๋œ๋‹ค. 'sudo bash'๋‚˜ 'su'๋กœ root ๊ถŒํ•œ์„ ์–ป์œผ๋ ค bash๋ฅผ ์‹คํ–‰ํ•  ๋•Œ๋„ ์ด ํŒŒ์ผ์ด ๋กœ๋“œ๋œ๋‹ค.

์ •๋ฆฌ:

  • โ€™.profile' - ๋กœ๊ทธ์ธํ•  ๋•Œ ๋กœ๋“œ๋œ๋‹ค. PATH์ฒ˜๋Ÿผ ๋กœ๊ทธ์ธํ•  ๋•Œ ๋กœ๋“œํ•ด์•ผ ํ•˜๋Š”๋ฐ bash์™€ ์ƒ๊ด€์—†๋Š” ๊ฒƒ๋“ค์„ ์—ฌ๊ธฐ์— ๋„ฃ๋Š”๋‹ค.
  • โ€˜.bash_profileโ€™ - ๋กœ๊ทธ์ธํ•  ๋•Œ ๋กœ๋“œ๋œ๋‹ค. โ€˜bash completion'์ด๋‚˜ 'nvm'๊ฐ™์ด ๋กœ๊ทธ์ธํ•  ๋•Œ ๋กœ๋“œํ•ด์•ผ ํ•˜๋Š”๋ฐ Bash์™€ ๊ด€๋ จ๋œ ๊ฒƒ์ด๋ฉด ์—ฌ๊ธฐ์— ๋„ฃ๋Š”๋‹ค.
  • โ€™.bashrc' - ๋กœ๊ทธ์ธํ•˜์ง€ ์•Š๊ณ  Bash๊ฐ€ ์‹คํ–‰๋  ๋•Œ๋งˆ๋‹ค ๋กœ๋“œ๋œ๋‹ค.


์ถœ์ฒ˜ : http://dogfeet.github.io/articles/2012/bash-profile.html


su์™€ su - ๋ชจ๋‘ root์˜ ๊ถŒํ•œ์œผ๋กœ ๋ณ€๊ฒฝ๋œ๋‹ค. ํ•˜์ง€๋งŒ ํ™˜๊ฒฝ๋ณ€์ˆ˜์—์„œ ์ฐจ์ด๊ฐ€ ์žˆ๋‹ค. 

su๋กœ root๊ฐ€ ๋˜์—ˆ๋‹ค๋ฉด root์˜ ํ™˜๊ฒฝ๋ณ€์ˆ˜๊ฐ€ ์•„๋‹ˆ๋ผ ๋‚ด ํ™˜๊ฒฝ๋ณ€์ˆ˜๋ฅผ ์‚ฌ์šฉํ•œ๋‹ค.

๋ฐ˜๋ฉด์— su - ๋กœ root๊ฐ€ ๋˜์—ˆ๋‹ค๋ฉด ๋‚ด ํ™˜๊ฒฝ๋ณ€์ˆ˜๊ฐ€ ์•„๋‹Œ root์˜ ํ™˜๊ฒฝ๋ณ€์ˆ˜๋ฅผ ์‚ฌ์šฉํ•˜๊ฒŒ ๋œ๋‹ค.


์˜ˆ๋ฅผ ๋“ค์–ด ๋‚ด๊ฐ€ aaa๊ณ„์ •์œผ๋กœ ๋กœ๊ทธ์ธ์„ ํ•˜๋ฉด ๋‚˜๋Š” /home/aaa ๋‚ด์˜ ํ™˜๊ฒฝ๋ณ€์ˆ˜ ์„ค์ •ํŒŒ์ผ(.bashrc๋‚˜ .profile, .bash_profile๋“ฑ)์— ์„ค์ •๋˜์–ด์žˆ๋Š” ํ™˜๊ฒฝ๋ณ€์ˆ˜๋ฅผ  ์‚ฌ์šฉํ•˜๊ฒŒ ๋œ๋‹ค. ์ด๋•Œ su๋ช…๋ น์–ด๋ฅผ ์ด์šฉํ•˜์—ฌ root๊ฐ€ ๋˜์—ˆ๋‹ค๊ณ  ์น˜์ž. ๋‚˜๋Š” root๊ถŒํ•œ์„ ๊ฐ€์ง€๊ธฐ๋Š” ํ–ˆ์ง€๋งŒ ๋‚ด๊ฐ€ ์‚ฌ์šฉํ•˜๋Š” ํ™˜๊ฒฝ๋ณ€์ˆ˜๋“ค์€ aaa์˜ ํ™˜๊ฒฝ๋ณ€์ˆ˜๋“ค์ด๋‹ค. ๋งˆ์น˜ root์˜ ๊ฐ€๋ฉด์„ ์“ด ๊ฒƒ๊ณผ ๊ฐ™์€๊ฒƒ์ด๋‹ค. root์™€ aaa์˜ ํ™˜๊ฒฝ๋ณ€์ˆ˜ ์„ค์ •์ด ๋™์ผํ•˜๋‹ค๋ฉด ๋ฌธ์ œ๋  ๊ฒƒ์ด ์—†๊ฒ ์ง€๋งŒ ์ผ๋ฐ˜์ ์œผ๋กœ ๊ทธ๋Ÿด์ผ์€ ๋ณ„๋กœ ์—†์„ ๊ฒƒ์ด๋‹ค. ๋ฐ˜๋ฉด์— su - ๋ช…๋ น์–ด๋กœ root๊ฐ€ ๋˜์—ˆ๋‹ค๋ฉด ๋‚˜๋Š” ์™„์ „ํžˆ root๋กœ ๋ณ€์‹ ํ•œ ๊ฒƒ๊ณผ ๊ฐ™๋‹ค. ํ™˜๊ฒฝ๋ณ€์ˆ˜๊นŒ์ง€ ๋ชจ๋‘ root์˜ ํ™˜๊ฒฝ๋ณ€์ˆ˜๋ฅผ ์ด์šฉํ•˜๊ธฐ ๋•Œ๋ฌธ์ด๋‹ค.


๋ฌด์Šจ ๋ง์„ ํ•˜๋Š”์ง€ ์ž˜ ๋ชจ๋ฅด๊ฒ ๋‹ค๊ณ ?? ์•„๋ž˜ ์˜ˆ์ œ๋ฅผ ๋ณด์ž.


kihyunhwang๊ณ„์ •์œผ๋กœ ๋กœ๊ทธ์ธํ•ด์„œ echo๋ช…๋ น์–ด๋กœ PATHํ™˜๊ฒฝ๋ณ€์ˆ˜๋ฅผ ์ถœ๋ ฅํ•ด๋ณด๊ณ , su๋กœ root๊ฐ€ ๋œ ๋’ค ๋˜ ์ถœ๋ ฅํ•ด๋ณด๊ณ , su -๋กœ root๊ฐ€ ๋˜์–ด ๋˜ ์ถœ๋ ฅํ•ด ๋ณด์•˜๋‹ค.

๊ฒฐ๊ณผ๋ฅผ ์ž˜ ๋ณด๋ฉด ์ฒซ๋ฒˆ์งธ ๋‘๋ฒˆ์งธ๋Š” PATH๋ณ€์ˆ˜์˜ ๊ฐ’์ด ๋™์ผํ–ˆ๋‹ค. ํ•˜์ง€๋งŒ ์„ธ๋ฒˆ์งธ PATH๋ณ€์ˆ˜ ๊ฐ’์€ ๋‹ค๋ฅด๋‹ค๋Š”๊ฒŒ ๋ณด์ผ๊ฒƒ์ด๋‹ค.


ํ•˜์ง€๋งŒ ์•„์ง ํ™•์‹ ์ด ์•ˆ์„œ๋Š” ๊ฒƒ์€ ๋ชจ๋“  ํ™˜๊ฒฝ๋ณ€์ˆ˜๊ฐ€ ๋ฐ”๋€Œ๋ƒ ์•ˆ๋ฐ”๋€Œ๋ƒ์ด๋‹ค. ํŠน์ • ํŒŒ์ผ์— ์žˆ๋Š” ๋ณ€์ˆ˜๋“ค๋งŒ ๋ฐ”๋€Œ๋Š” ๊ฑด์ง€ ์•„์ง ํ™•์ธ์„ ๋ชปํ•ด๋ณด์•˜๋‹ค. ์‹œ๊ฐ„์žˆ๋Š” ๋ถ„๋“ค์ด ํ™•์ธํ•ด์„œ ๋Œ“๊ธ€ ๋‹ฌ์•„์ฃผ์‹œ๋ฉด ๊ฐ์‚ฌ ๊ฐ์‚ฌ!!


์ปค๋งจ๋“œ ๋ผ์ธ์—์„œ vi backup.sh๋ช…๋ น์–ด๋ฅผ ์ด์šฉํ•˜์—ฌ ํŒŒ์ผ์„ ์ƒ์„ฑํ•˜๊ณ  ์•„๋ž˜์™€ ๊ฐ™์€ ์Šคํฌ๋ฆฝํŠธ๋ฅผ ๋„ฃ๋Š”๋‹ค.

์•„๋ž˜ ์ปค๋งจ๋“œ๋Š” ์ž์‹ ์ด ์‚ฌ์šฉํ•˜๊ณ  ์žˆ๋Š” ํ™˜๊ฒฝ์— ๋”ฐ๋ผ ๋‹ฌ๋ผ์ ธ์•ผ ํ•œ๋‹ค๋Š” ์ ์€ ๋‹น์—ฐํžˆ ์•Œ๊ณ  ์žˆ๋Š” ๋ถ„๋“ค์ด ์ด ๊ธ€์„ ์ฝ์„ ๊ฒƒ์ด๋ผ ๋ณด๊ณ  ์ž์„ธํ•œ ์„ค๋ช…์€ ์ƒ๋žต.

(๋‚˜๋Š” backupํŒŒ์ผ์„ crond์— ๋“ฑ๋กํ•˜์—ฌ ๋งค๋‹ฌ 1์ผ์— NAS์„œ๋ฒ„๋กœ ๋ฐฑ์—…ํ•˜๋„๋ก ์„ค์ •ํ•˜์˜€๋‹ค.) 

====================================================================================== 

#!/bin/sh
USER_ID=yourid
PWD=yourpassword

FILE_NAME=`ls -lrt *.gz|tail -1|cut -d ' ' -f 8` 


CURR_DATE=`date +%Y%m%d%H%M`
FILE_NAME2=$CURR_DATE'_trac_backup.tar'


ftp -n 192.168.0.100 << SCRIPT
user $USER_ID $PWD
binary

cd /Backup
put $FILE_NAME
put $FILE_NAME2

quit

SCRIPT


rm $FILE_NAME 


๋ฆฌ๋ˆ…์Šค์—์„œ ์ž๋ฐ” ํ™ˆ ์„ค์ •ํ•˜๊ธฐ์ž…๋‹ˆ๋‹ค. 


๊ฐœ์ธ ๊ณ„์ •์—์„œ ์„ค์ •ํ•˜๋Š” ๋ฐฉ๋ฒ•๊ณผ ๋ชจ๋“  ๊ณ„์ •์„ ์œ„ํ•œ ์„ค์ •๋ฐฉ๋ฒ•์„ ์„ค๋ช…ํ•ฉ๋‹ˆ๋‹ค.

(์ž๋ฐ”๋Š” ์ด๋ฏธ ์„ค์น˜๊ฐ€ ๋˜์–ด ์žˆ๋‹ค๊ณ  ๊ฐ€์ •ํ•ฉ๋‹ˆ๋‹ค.)

Set JAVA_HOME / PATH for a single user


์ž์‹ ์˜ ๊ณ„์ •์œผ๋กœ ๋กœ๊ทธ์ธํ•ฉ๋‹ˆ๋‹ค.


$ vi ~/.bash_profile 

(์ƒ๋žต)
export JAVA_HOME=/usr/java/jdk1.6.0_45
export PATH=$PATH:/usr/java/jdk1.6.0_45/bin

(์ƒ๋žต)


์ด์ œ ์ €์žฅํ•˜๊ณ  vi์—์„œ ๋‚˜์™€์„œ ๋ณ€๊ฒฝ์‚ฌํ•ญ์„ ์ ์šฉํ•ฉ๋‹ˆ๋‹ค. 


$ source ~/.bash_profile
OR
$ . ~/.bash_profile


๋ณ€๊ฒฝ์‚ฌํ•ญ์ด ์ ์šฉ์ด ๋๋Š”์ง€ ํ™•์ธํ•ฉ์‹œ๋‹ค.


$ echo $JAVA_HOME
$ echo $PATH


$ which java


Set JAVA_HOME / PATH for all user

์ด๊ฑด ๋ฌผ๋ก  root๊ถŒํ•œ์ด ์žˆ์–ด์•ผ ๊ฒ ์ฃ ? 

์ˆ˜์ •ํ•  ํŒŒ์ผ๋งŒ ๋ฐ”๋€” ๋ฟ ์‚ฝ์ž…ํ•˜๋Š” ๋‚ด์šฉ์€ ๋™์ผํ•ฉ๋‹ˆ๋‹ค.


# vi /etc/profile
(์ƒ๋žต)

export JAVA_HOME=/usr/java/jdk1.6.0_45
export PATH=$PATH:/usr/java/jdk1.6.0_45/bin
(์ƒ๋žต)


์ €์žฅํ•˜๊ณ  ๋‚˜์™€์„œ ์ ์šฉํ•ฉ๋‹ˆ๋‹ค.


# source /etc/profile
OR
# . /etc/profille


๊ฐ‘์ž๊ธฐ ์„œ๋ฒ„์˜ ๋ฌผ๋ฆฌ์  ๋ฉ”๋ชจ๋ฆฌ ์‚ฌ์ด์ฆˆ๊ฐ€ ๊ถ๊ธˆํ•ด์กŒ๋‹ค.


๋ณดํ†ต ๋ฌผ๋ฆฌ์  ๋ฉ”๋ชจ๋ฆฌ์˜ ์‚ฌ์ด์ฆˆ๋Š” ๋ถ€ํŒ…ํ•  ๋•Œ ํ‘œ์‹œ๊ฐ€ ๋œ๋‹ค.


๊ทธ๋Ÿฐ๋ฐ ๋ง๊ทธ๋Œ€๋กœ ์„œ๋ฒ„์ด๋‹ˆ ๋งˆ์Œ๋Œ€๋กœ ๋‚ด๋ ธ๋‹ค๊ฐ€ ์˜ฌ๋ฆฌ๊ณ  ํ•  ์ˆ˜๋„ ์—†๋Š” ๋…ธ๋ฆ‡์ด๊ณ   


๋”ธ๋ž‘ ๋ฉ”๋ชจ๋ฆฌ ์‚ฌ์ด์ฆˆ๋ณด์ž๊ณ  ์žฌ๋ถ€ํŒ…ํ•œ๋‹ค๋Š”๊ฑด ์–ด์ฒ˜๊ตฌ๋‹ˆ ์—†๋Š” ์ผ์ด๋‹ค.


๊ทธ๋ž˜์„œ ๊ตฌ๊ธ€๋ง์„ ํ•ด๋ณด์•˜๋‹ค.


๋ฆฌ๋ˆ…์Šค ๋ช…๋ น์–ด ์ค‘์— dmidecode๋ผ๋Š” ๋ช…๋ น์–ด๊ฐ€ ์žˆ๋‹ค.


์ด ๋ช…๋ น์–ด๋ฅผ ์ด์šฉํ•ด์„œ ๋ฉ”๋ชจ๋ฆฌ์˜ ์ •๋ณด๋ฅผ ๊ฐ€์ ธ์˜ฌ ์ˆ˜ ์žˆ๋‹ค.


ํ•ด๋‹น ๋ช…๋ น์–ด์— ๋Œ€ํ•œ ์ž์„ธํ•œ ๋‚ด์šฉ์€ ์ง์ ‘ ๊ตฌ๊ธ€๋งํ•ด๋ณด์‹œ๊ธฐ๋กœ ํ•˜๊ณ  ์—ฌ๊ธฐ์„œ๋Š” ๋ฉ”๋ชจ๋ฆฌ๊ฐ€ ๋ช‡๊ฐœ๊ฐ€ ๋“ค์–ด๊ฐ€ ์žˆ๋Š”์ง€ ์‚ฌ์ด์ฆˆ๋Š” ์–ผ๋งŒ์ธ์ง€ ์•Œ ์ˆ˜ ์žˆ๋Š” ํ•„ํ„ฐ๋ง๋งŒ ์ œ๊ณต์„ ํ•˜๊ฒ ๋‹ค.


~]# dmidecode | grep 'Size.*MB'


์œ„ ๋ช…๋ น์–ด๋Š” ๋ฌผ๋ฆฌ์ ์ธ ๋ฉ”๋ชจ๋ฆฌ์— ๋Œ€ํ•œ ์‚ฌ์ด์ฆˆ ์ •๋ณด๋งŒ ๋ณด์—ฌ์ค€๋‹ค. ํ•˜์ง€๋งŒ ๋ฉ”๋ชจ๋ฆฌ๊ฐ€ ์—ฌ๋Ÿฌ๊ฐœ๋กœ ๋‚˜๋‰˜์–ด์ ธ ์žˆ์„ ๊ฒฝ์šฐ ์—ฌ๋Ÿฌ ์ค„์ด ๋‚˜์˜ฌ ๊ฒƒ์ด๋‹ค.

์˜ˆ๋ฅผ๋“ค์–ด ์„œ๋ฒ„์˜ ์ด ๋ฉ”๋ชจ๋ฆฌ๊ฐ€ 8GB์ธ๋ฐ 4GB x 2๊ฐœ๋กœ ์ด๋ฃจ์–ด์ ธ ์žˆ๋‹ค๊ณ  ํ•˜๋ฉด ํ™”๋ฉด์—๋Š” ์•„๋ž˜์™€ ๊ฐ™์ด ๋‚˜์˜ฌ ๊ฒƒ์ด๋‹ค.


 Size: 4096 MB
 Size: 4096 MB


๋ช‡์ค„์ด ๋‚˜์˜ค๋ƒ๋Š” ๋ฌผ๋ฆฌ์  ๋ฉ”๋ชจ๋ฆฌ์˜ ๊ฐœ์ˆ˜๋ฅผ ๋‚˜ํƒ€๋‚ด๊ณ  ์‚ฌ์ด์ฆˆ๋Š” ๋‹ค ํ•ฉ์นœ๊ฒŒ ์ด ๋ฉ”๋ชจ๋ฆฌ ์‚ฌ์ด์ฆˆ๊ฐ€ ๋˜๋Š” ๊ฒƒ์ด๋‹ค.


๋˜ ๋‹ค๋ฅธ ๋ช…๋ น์–ด๋กœ๋„ ํ™•์ธํ•  ์ˆ˜ ์žˆ๋Š”๋ฐ ์•„๋งˆ ์ด๊ฒŒ ๋ณด๊ธฐ๋Š” ๋” ํŽธํ•  ๊ฒƒ์ด๋‹ค.


~]# cat /proc/meminfo


๋ช…๋ น์–ด๋ฅผ ์ด์šฉํ•˜๋ฉด ๋ฉ”๋ชจ๋ฆฌ์™€ ๊ด€๋ จ๋œ ๋ชฉ๋ก์ด ์ฃผ๋ฃจ๋ฃจ๋ฃจ~~~~~ใ„ฑ ๋‚˜์˜จ๋‹ค. ์ œ์ผ ์œ„์— ๋‚˜์˜ค๋Š” ๊ฒƒ์ด MemTotal์ธ๋ฐ kb๋‹จ์œ„๋กœ ๋‚˜์˜จ๋‹ค.


You need to use tar command as follows (syntax of tar command):
tar -zcvf [ํŒŒ์ผ๋ช….tar.gz] [์••์ถ•ํ•˜๊ณ ์žํ•˜๋Š”ํŒŒ์ผ/๋””๋ ‰ํ† ๋ฆฌ ๋ช…]
Where,

  • -z: Compress archive using gzip program
  • -c: Create archive
  • -v: Verbose i.e display progress while creating archive
  • -f: Archive File name

For example, you have directory called /home/jerry/prog and you would like to compress this directory then you can type tar command as follows:

/home/jerry/prog ํด๋” ๋ฐ ํ•˜์œ„ ํด๋”์— ์žˆ๋Š” ๋ชจ๋“  ํŒŒ์ผ์„ prog.tar.gz ๋กœ ์••์ถ•
$ tar -zcvf prog.tar.gz /home/jerry/prog

Above command will create an archive file called prog-1-jan-2005.tar.gz in current directory. If you wish to restore your archive then you need to use following command (it will extract all files in current directory):

ํ˜„์žฌ ์œ„์น˜์—์„œ ์••์ถ•์„ ํ’€๊ณ ์ž ํ•  ๋•Œ
$ tar -zxvf prog-1-jan-2005.tar.gz

Where,

  • -x: Extract files

If you wish to extract files in particular directory, for example in /tmp then you need to use following command:

์›ํ•˜๋Š” ์œ„์น˜์— ์••์ถ•์„ ํ’€๊ณ ์ž ํ•  ๋•Œ
$ tar -zxvf prog-1-jan-2005.tar.gz -C /tmp
$ cd /tmp
$ ls -


์ถœ์ฒ˜ : http://www.cyberciti.biz/faq/how-do-i-compress-a-whole-linux-or-unix-directory/

1. ์—…๋ฐ์ดํŠธํ•  ๋ชฉ๋ก์„ ๋ณด๋ ค๋ฉด?
# yum list updates


2. ์—…๋ฐ์ดํŠธ ๋ชฉ๋ก์„ ๋‹ค์šด๋กœ๋“œํ•˜๊ณ , ์—…๋ฐ์ดํŠธ๋ฅผ ์„ค์น˜ํ•˜๋ ค๋ฉด?
# yum update -y


3. ์„ค์น˜๋œ rpm ํŒจํ‚ค์ง€ ๋ชฉ๋ก์„ ๋ณด๋ ค๋ฉด?
# rpm -qa
๋˜๋Š”
# yum list installed

4. gcc ํŒจํ‚ค์ง€๊ฐ€ ์„ค์น˜๋˜์–ด ์žˆ๋Š”์ง€ ํ™•์ธ ํ•˜๋ ค๋ฉด?
# rpm -qa | grep gcc
๋˜๋Š”
# yum list installed gcc


5. gcc ํŒจํ‚ค์ง€๋ฅผ ์„ค์น˜ํ•˜๋ ค๋ฉด?
# yum install gcc gcc-c++

6. gcc ํŒจํ‚ค์ง€๋ฅผ ์—…๋ฐ์ดํŠธ ํ•˜๋ ค๋ฉด?
# yum update gcc gcc-c++


7. ํŒจํ‚ค์ง€ ์ด๋ฆ„์œผ๋กœ ๊ฒ€์ƒ‰ํ•˜๋ ค๋ฉด?
# yum list ํŒจํ‚ค์ง€๋ช…
# yum list ์ •๊ทœ์‹
# yum list gcc
# yum list gcc*

8. ์—ฌ๋Ÿฌ๊ฐœ์˜ ํŒจํ‚ค์ง€๋ฅผ ์„ค์น˜ํ•˜๋ ค๋ฉด?
# yum install gcc gcc-c++


9. ํŒจํ‚ค์ง€๋ฅผ ์‚ญ์ œํ•˜๋ ค๋ฉด?
# yum remove gcc gcc-c++

10. ์„ค์น˜๊ฐ€ ๊ฐ€๋Šฅํ•œ ๋ชจ๋“  ํŒจํ‚ค์ง€๋ฅผ ๋ณด๋ ค๋ฉด?
# yum list all

11. ํŒจํ‚ค์ง€ ๊ทธ๋ฃน์„ ๋ณด๋ ค๋ฉด?
# yum grouplist

12. ๊ทธ๋ฃน ํŒจํ‚ค์ง€๋ฅผ ๋ชจ๋‘ ์„ค์น˜ํ•˜๋ ค๋ฉด?
# yum groupinstall "Development Tools"

13. ๊ทธ๋ฃน ํŒจํ‚ค์ง€๋ฅผ ์—…๋ฐ์ดํŠธ ํ•˜๋ ค๋ฉด?
# yum groupupdate "Development Tools"

14. ๊ทธ๋ฃน ํŒจํ‚ค์ง€๋ฅผ ์‚ญ์ œํ•˜๋ ค๋ฉด?
# yum groupremove "Development Tools"

15. ์•„ํ‚คํ…์ฒ˜๋ฅผ ์ง€์ •ํ•˜์—ฌ ์„ค์น˜ํ•˜๋ ค๋ฉด?
# yum install mysql.i386

16. ํŒŒ์ผ์„ ๊ฐ€์ง€๊ณ  ์žˆ๋Š” ํŒจํ‚ค์ง€๋ช…์„ ์•Œ๋ ค๋ฉด?
# rpm -qf /etc/passwd
๋˜๋Š”
# yum whatprovides /etc/passwd

17. ๋งจํŽ˜์ด์ง€๋ฅผ ๋ณด๋ ค๋ฉด?
# man yum

์œ ๋‹‰์Šค ํ™˜๊ฒฝ์—์„œ ์ž๋™๋ฐฑ์—… ์‰˜ ์Šคํฌ๋ฆฝํŠธ๋ฅผ ๋งŒ๋“ค๋‹ค๊ฐ€ ์–ป์€ ์ง€์‹์„ ๊ณต์œ ํ•ฉ๋‹ˆ๋‹ค.


๋ฐฑ์—…ํŒŒ์ผ์„ ์ž๋™์œผ๋กœ ์ƒ์„ฑํ•˜๋„๋ก ์Šค์ผ€์ฅด๋ง์„ ๊ฑธ์–ด๋†“์€ ์ƒํƒœ์—์„œ ๊ฐ€์žฅ ์ตœ์‹  ๋ฐฑ์—…ํŒŒ์ผ์„ ๊ณจ๋ผ์„œ ๋‹ค๋ฅธ ์›๊ฒฉ์„œ๋ฒ„๋กœ ftp๋ฅผ ์ด์šฉํ•ด์„œ ์ „์†กํ•˜๋ ค๊ณ  ํ–ˆ์Šต๋‹ˆ๋‹ค. ์ด๋•Œ ๊ฐ€์žฅ ์ตœ์‹  ํŒŒ์ผ๋ช…์„ ์•Œ์•„์•ผ FTP๋ฅผ ์ด์šฉํ•ด์„œ ์ „์†ก์„ ํ•˜๊ฒ ์ฃ ?


๊ทธ๋ž˜์„œ ์ตœ์‹ ํŒŒ์ผ๋ช…๋งŒ ์–ป์–ด๋‚ผ ์ˆ˜ ์žˆ๋Š” ๋ช…๋ น์–ด๋ฅผ ํ•œ๋ฒˆ ๋งŒ๋“ค์–ด๋ณด๋„๋ก ํ•˜๊ฒ ์Šต๋‹ˆ๋‹ค.


์šฐ์„  1์ฐจ๋กœ ๋งŒ๋“ค์–ด๋ณธ ๊ฒƒ์€ ์•„๋ž˜์™€ ๊ฐ™์Šต๋‹ˆ๋‹ค.


# ls -lrt *.gz|tail -1|cut -d ' ' -f 8


ํ•˜์ง€๋งŒ ์œ„ ์ฒ˜๋Ÿผ ํ•  ๊ฒฝ์šฐ ๋งŒ์•ฝ ์ŠคํŽ˜์ด์Šค๊ฐ€ ๋‘๊ฐœ ์ด์ƒ์ด ์žˆ๋Š” ๊ฒฝ์šฐ ํŒŒ์ผ๋ช…์ด ์•„๋‹Œ ํŒŒ์ผ์ƒ์„ฑ ์‹œ๊ฐ„ ๊ฐ’์„ ์–ป์–ด์˜ค๊ฒŒ๋˜๋Š” ์—‰๋šฑํ•œ ๊ฒฐ๊ณผ๊ฐ€ ๋‚˜์˜ฌ ๋•Œ๊ฐ€ ์žˆ์Šต๋‹ˆ๋‹ค. ๊ทธ๋ž˜์„œ...


# ls -lrt *.gz|tail -1|tr -s ' '|cut -d ' ' -f 8


์ด๋ ‡๊ฒŒ tr ๋ช…๋ น์–ด๋ฅผ ์ค‘๊ฐ„์— ๋ผ์›Œ๋„ฃ์—ˆ์Šต๋‹ˆ๋‹ค.


์ด ๋ช…๋ น์–ด์™€ ๋™์ผํ•œ ๊ฒฐ๊ณผ๋ฅผ ์–ป์„ ์ˆ˜ ์žˆ๋Š”๊ฒŒ ํ•˜๋‚˜ ๋” ์žˆ๋Š”๋ฐ ๊ทธ๊ฑด ์•„๋ž˜์™€ ๊ฐ™์Šต๋‹ˆ๋‹ค.


# ls -lrt *.gz|tail -1|awk '{print $8}`


์ด๋ ‡๊ฒŒํ•˜๋ฉด ์ข€ ๋” ์งง๊ณ  ๊ฐ„๋‹จํ•˜๊ฒŒ ํŒŒ์ผ๋ช…์„ ์–ป์–ด์˜ฌ ์ˆ˜ ์žˆ์Šต๋‹ˆ๋‹ค.

์„œ๋ฒ„์‹œ๊ฐ„์ด ๋กœ์ปฌ์‹œ๊ฐ„๊ณผ 10๋ถ„๊ฐ€๋Ÿ‰ ์ฐจ์ด๊ฐ€๋‚˜์„œ ํ†ต๊ณ„ ์ˆ˜์ง‘์‹œ ํ™•์ธํ•  ๋•Œ๋งˆ๋‹ค ํ—ท๊ฐˆ๋ ค์„œ ์‹œ๊ฐ„ ๋ณ€๊ฒฝ์„ ์–ด๋–ป๊ฒŒ ํ•ด์•ผํ•˜๋Š”์ง€ ์•Œ์•„๋ณด๋‹ค๊ฐ€ ์ฐพ์€ ์ •๋ณด์ž…๋‹ˆ๋‹ค.

Below information is from here

-----------------------------------------------------------------------------

Changing the timezone, date, and time

Setting your time zone

In /etc the file, localtime, is a link to or copy of a file containing information about your time zone. Zone information files are usually in /usr/share/zoneinfo but this depends on your distribution. So if your localtime file points to a zone info file that is not your time zone you can change it by browsing the directories in /usr/share/zoneinfo to find your country, then find your city or a city in the same time zone and link localtime to it.
    $ ln -sf /usr/share/zoneinfo/America/Los_Angeles /etc/localtime
Some applications may use the configuration file /etc/sysconfig/clock to determine the current time zone so it's a good idea to set the ZONE entry (e.g. "America/Los_Angeles").

Changing the date and time

Changing the date and time requires two steps. First, Linux's date and time must be changed and then the new time has to be written to the hardware clock.
The date command can be used for both viewing and changing the date and time.
To change the time use date followed by the month, day, hour, minute, and year all numeric and no spaces. So, to set the date and time to November 2nd, 2003 12:57
The hardware clock can be updated in UTC (coordinated universal time) or your local time. It is standard practice to update it in UTC.
To update it to your local time leave off the --utc or add --localtime and leave off the --utc.

Alternatively

The date and time can be changed directly to the hardware clock and then used to update the system clock.

Using NTP (Network Time Protocol)

NTP will connect to a server to get the atomic time. It can be downloaded from www.ntp.org/downloads.html To get started with NTP simply download it, install it, use the ntpdate command followed by a public time server, and update your hardware clock.
    $ ntpdate "server DNS name or IP address"
    4 Nov 22:31:28 ntpdate[26157]: step time server 209.81.9.7 offset 22317290.440932 sec
    $ hwclock --systohc
A public time server can be found at http://support.ntp.org/bin/view/Servers/WebHome

To keep your time accurate you can create a cron job that executes:
(the -w option is the same as --systohc)
    ntpdate "server name" && hwclock -w

To stay independent of a particiluar server you can use 0.pool.ntp.org (0, 1, or 2) for the server name. This domain uses DNS round robin to choose different time servers every so often. This keeps certain nameservers from having high loads. The only disadvantage is the increased potential of updating time from a nameserver who is in the pool but has an incorrect time settings.

These are volunteer public servers so be polite, do not constantly access the public servers, use only public servers (not private), and if you have multiple machines, set up a ntp server and have your other machines retrieve the time from your local server. Check http://www.eecis.udel.edu/~mills/ntp/servers.html for detailed rules.


์ถœ์ฒ˜ : http://www.hypexr.org/linux_date_time_help.php

ํŠน์ • ํ…Œ์ด๋ธ”์˜ ์ œ์•ฝ์‚ฌํ•ญ( not null, fk ๊ณผ ๊ฐ™์€ )์˜ ์ด๋ฆ„, ํ…Œ์ด๋ธ”๋ช…, ์†Œ์œ ์ž์˜ ๋ชฉ๋ก์„ ๋ณด์—ฌ์ค๋‹ˆ๋‹ค.

Below query command queries constraints'(not null, fk) name , owner, table name, column name, and position of the column.


SQL > select * from user_cons_columns where table_name='table_name';

ํ…Œ์ด๋ธ” ๋ฐฑ์—…์„ ํ• ๋•Œ์— export / import ๋ฅผ ์ด์šฉํ•  ์ˆ˜๋„ ์žˆ์ง€๋งŒ ๋‹จ์ˆœํ•˜๊ฒŒ rename ๋ช…๋ น์–ด๋ฅผ ์ด์šฉํ•  ์ˆ˜๋„ ์žˆ์Šต๋‹ˆ๋‹ค. ๋˜ํ•œ create ~ as select ~ ๋ฅผ ์ด์šฉํ•  ์ˆ˜๋„ ์žˆ์Šต๋‹ˆ๋‹ค.

ํ•˜์ง€๋งŒ ์˜ค๋Š˜์€ ํ…Œ์ด๋ธ” ๋ช…์„ ๋ณ€๊ฒฝํ•˜๊ณ  ์ƒˆ๋กœ ํ…Œ์ด๋ธ”์„ ์ƒ์„ฑํ•จ์œผ๋กœ์จ ๋ฐฑ์—…์„ ํ•  ์ˆ˜ ์žˆ๋Š” ๋ฐฉ๋ฒ•์„ ์†Œ๊ฐœํ•˜๋„๋ก ํ•˜๊ฒ ์Šต๋‹ˆ๋‹ค. ์ฐธ๊ณ ๋กœ ์ด ๋ฐฉ๋ฒ•์€ blob๋ฐ์ดํƒ€๊ฐ€ ๋งŽ์€ ๊ฒฝ์šฐ์— ์ƒ๋‹นํžˆ ์œ ์šฉํ•ฉ๋‹ˆ๋‹ค.


Step by Step

1) Query table name and index names linked to the table you want to backup

2) Rename table name

3) Rename indexes' name ( if specified explicitly when it is created )

4) Rename constraints' name ( if specified explicitly when it is created )

4) Use the same DDL used to create the renamed table


โ€ป This way is very simple and fast then using "create table ~ as select * from ~" statement when the table has a huge blob data.


1) ๋ณ€๊ฒฝํ•˜๊ณ ์žํ•˜๋Š” ํ…Œ์ด๋ธ”์— ์–ด๋–ค ์ธ๋ฑ์Šค๋“ค์ด ์žˆ๋Š”์ง€ ์กฐํšŒํ•ฉ๋‹ˆ๋‹ค.

SQL > select index_name, table_name from user_indexes;


2) ํ…Œ์ด๋ธ”๋ช…์„ ๋ณ€๊ฒฝํ•ฉ๋‹ˆ๋‹ค.

SQL > rename old_table to new_table;


3) ์ธ๋ฑ์Šค๋ช…์„ ๋ณ€๊ฒฝํ•ฉ๋‹ˆ๋‹ค. ( ์ธ๋ฑ์Šค๋ช…์ด ์ž๋™์ƒ์„ฑ๋œ ๊ฒƒ์ด ์•„๋‹Œ ๊ฒฝ์šฐ์—๋งŒ )

SQL > alter index pk_old_table rename to pk_new_table;


4) ์ œ์•ฝ์‚ฌํ•ญ๋ช…์„ ๋ณ€๊ฒฝํ•ฉ๋‹ˆ๋‹ค. ( ์ œ์•ฝ์‚ฌํ•ญ๋ช…์ด ์ž๋™์ƒ์„ฑ๋œ ๊ฒƒ์ด ์•„๋‹Œ ๊ฒฝ์šฐ์—๋งŒ )

SQL > select * from user_cons_columns where table_name='{table_name};

SQL > alter table {table name} rename constraint {constraint name} to {new constraint name}


5) ๊ธฐ์กด ํ…Œ์ด๋ธ”์„ ์ƒ์„ฑํ–ˆ๋˜ DDL์„ ์‚ฌ์šฉํ•˜์—ฌ ํ…Œ์ด๋ธ”์„ ์ƒˆ๋กœ ์ƒ์„ฑํ•ฉ๋‹ˆ๋‹ค.

SQL > create table .........


์˜ค๋Š˜์€ ํ…Œ์ด๋ธ” ๋ช… ๋ณ€๊ฒฝํ•˜๋Š” ๋ฒ•์— ๋Œ€ํ•ด์„œ ์•Œ์•„๋ณด๋„๋ก ํ•˜๊ฒ ์Šต๋‹ˆ๋‹ค.


ํ…Œ์ด๋ธ” ๋ช…์„ ๋ณ€๊ฒฝํ•  ๋•Œ๋Š” ์•„๋ž˜์ฒ˜๋Ÿผ rename ๋ช…๋ น์–ด๋ฅผ ์‚ฌ์šฉํ•ฉ๋‹ˆ๋‹ค.

Use rename command to rename a table to a new one.


SQL > rename {old table name} to {new table name}

Table renamed.


๋ณ€๊ฒฝ์ด ์™„๋ฃŒ๋˜์—ˆ๋Š”์ง€ ์•„๋ž˜์ฟผ๋ฆฌ๋ฅผ ์ด์šฉํ•ด์„œ ํ™•์ธํ•ด๋ณด์„ธ์š”.

Check if renaming was successful using below query. Below statement queries the table names owned by you.


SQL > select table_name from user_tables;


You would see renamed table name if it was successful.


์ผ๋ฐ˜์œ ์ €๋กœ ๋‚ด๊ฐ€ ๊ฐ€์ง€๊ณ  ์žˆ๋Š” ์ธ๋ฑ์Šค ๋ชฉ๋ก์„ ์กฐํšŒํ•˜๋ ค๋ฉด ์•„๋ž˜ ์ฟผ๋ฆฌ๋ฅผ ์‚ฌ์šฉํ•ฉ๋‹ˆ๋‹ค.

Querying index list owned by me.


SQL > select * from user_indexes;

Better to use below query to know which index is from which table because there are so many information on the user_indexes table.

์œ„ ์ฟผ๋ฆฌ๋ฅผ ์‹คํ–‰ํ•˜๋ฉด ์ƒ๋‹นํžˆ ๋งŽ์€ ์–‘์˜ ์ •๋ณด๊ฐ€ ๋‚˜์˜ค๊ฒŒ ๋ฉ๋‹ˆ๋‹ค. ์–ด๋Š ํ…Œ์ด๋ธ”์— ์–ด๋Š ์ธ๋ฑ์Šค๊ฐ€ ์žˆ๋Š”์ง€๊ฐ€ ๊ถ๊ธˆํ•˜๋‹ค๋ฉด ์•„๋ž˜ ์ฟผ๋ฆฌ๋ฅผ ์ด์šฉํ•˜์‹œ๋ฉด ๋ฉ๋‹ˆ๋‹ค.

SQL > select index_name, table_name from user_indexes;