안녕하세요, 케이치입니다.
오늘은 연락처 관리 프로그램을 만드는 웹앱 프로젝트를 진행해보려고 합니다.
사용할 도구는 Eclipse 2020-06 R 이고요, 스프링부트와 부트스트랩, 그리고 데이터베이스 연동은 mamp와 mybatis를 사용합니다.
우선 기본적인 도구들과 라이브러리들 그리고 플러그인들을 설치해야합니다.
개발환경은 다음과 같습니다.
- MacOS Catalina (10.15.6)
- Eclipse 2020-06 R (Download)
- Eclipse Spring Tool Suite 4 (설치하기 가이드)
- MAMP (Download) -> community 버전 다운로드 받으세요, Window사용자의 경우 WAMP를 설치하셔야 합니다.
- DBeaver (데이터베이스 무료 툴 Download) -> community 버전 다운로드 받으세요
자, 위 도구들을 모두 설치완료했다면 이제부터 시작해보겠습니다.
우선 결과물은 아래 동영상처럼 나올겁니다.
자, 그럼 어떻게 만드는지 본격적으로 알아보도록 하겠습니다.
진행은 아래 순서대로 합니다.
- 테이블 설계
- 백엔드 구현
- 프론트 구현
테이블 설계
우선 테이블 설계부터 하겠습니다. (MAMP설치 및 테이블 소유자 권한 등의 설정은 여기서 다루지 않습니다.)
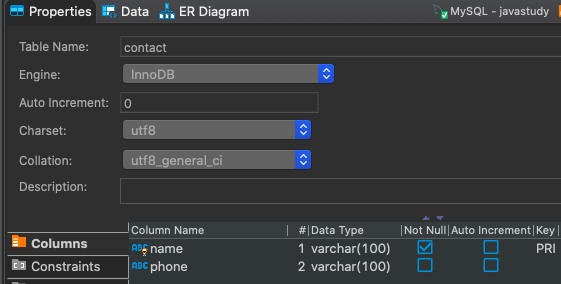
테이블은 contact 라고 명명지어주고 컬럼은 아래처럼 두 개만 추가를 해줄 겁니다.
CREATE TABLE `contact` (
  `name` varchar(100) NOT NULL,
  `phone` varchar(100) DEFAULT NULL,
  PRIMARY KEY (`name`)
) ENGINE=InnoDB DEFAULT CHARSET=utf8
정말 간단한 연락처 관리 프로그램이므로 이름과 연락처 정보만 담을 예정이고 개인정보 암호화 같은건 다루지 않습니다.
입력받은 정보 그대로 string으로 저장을 하도록 하겠습니다.
이렇게 테이블 설계가 완료되면 이제 백엔드에서 쿼리해올 수 있도록 구현을 들어가보겠습니다.
백엔드 개발
우선 새로운 프로젝트를 만들어야겠죠.
아래 순서대로 새로운 프로젝트를 만들어 줍니다.
Project Explorer > New > Project 선택

Wizards에서 spring으로 검색한 뒤 Spring Starter Prject 선택 (이게 안나온다면 STS설치하기부터 하고 오시면 됩니다.)

Name 항목은 프로젝트명을 입력하는 곳입니다.
여기에 contact-manager 라고 넣어주시고 Java Version은 8 이상으로 아무거나 쓰셔도 무방할겁니다.
여기서는 Java 11 버전을 사용하였습니다.

Next를 눌러 다음으로 넘어간 뒤 Available 검색창에서 spring web, lombok, mybatis, mysql를 검색하여 우측의 selected 항목에 세 개 항목이 들어가도록 체크하고 Finish 버튼을 클릭합니다. 저는 이미 사용한 적이 있어서 Frequently Used에 항목이 나타나서 체크만 해주었습니다. 처음 하시는 분들은 Available에서 검색하시면 됩니다.

우측 하단에 progress bar가 진행되는 것을 확인할 수 있습니다.

또는 Progress View에서 확인할 수도 있죠. Progress View가 안보인다면 이클립스 상단 메뉴에서 Window > Show View > Other > Progress로 검색하면 추가할 수 있습니다.

진행이 완료되었으면 Project Explorer에서 아래처럼 파일트리가 보일겁니다.

pom.xml 파일에는 아래와 같은 내용이 들어있죠.
<?xml version="1.0" encoding="UTF-8"?>
<project xmlns="http://maven.apache.org/POM/4.0.0" xmlns:xsi="http://www.w3.org/2001/XMLSchema-instance"
	xsi:schemaLocation="http://maven.apache.org/POM/4.0.0 https://maven.apache.org/xsd/maven-4.0.0.xsd">
	<modelVersion>4.0.0</modelVersion>
	<parent>
		<groupId>org.springframework.boot</groupId>
		<artifactId>spring-boot-starter-parent</artifactId>
		<version>2.3.2.RELEASE</version>
		<relativePath/> <!-- lookup parent from repository -->
	</parent>
	<groupId>com.example</groupId>
	<artifactId>contact-manager</artifactId>
	<version>0.0.1-SNAPSHOT</version>
	<name>contact-manager</name>
	<description>Demo project for Spring Boot</description>

	<properties>
		<java.version>11</java.version>
	</properties>

	<dependencies>
		<dependency>
			<groupId>org.springframework.boot</groupId>
			<artifactId>spring-boot-starter-web</artifactId>
		</dependency>
		<dependency>
			<groupId>org.mybatis.spring.boot</groupId>
			<artifactId>mybatis-spring-boot-starter</artifactId>
			<version>2.1.3</version>
		</dependency>

		<dependency>
			<groupId>mysql</groupId>
			<artifactId>mysql-connector-java</artifactId>
			<scope>runtime</scope>
		</dependency>
		<dependency>
			<groupId>org.projectlombok</groupId>
			<artifactId>lombok</artifactId>
			<optional>true</optional>
		</dependency>

		<dependency>
			<groupId>org.springframework.boot</groupId>
			<artifactId>spring-boot-starter-test</artifactId>
			<scope>test</scope>
			<exclusions>
				<exclusion>
					<groupId>org.junit.vintage</groupId>
					<artifactId>junit-vintage-engine</artifactId>
				</exclusion>
			</exclusions>
		</dependency>
	</dependencies>

	<build>
		<plugins>
			<plugin>
				<groupId>org.springframework.boot</groupId>
				<artifactId>spring-boot-maven-plugin</artifactId>
			</plugin>
		</plugins>
	</build>

</project>
이제 자바로 코딩할 준비가 되었습니다.
우선 위에서 만든 contact 테이블의 내용을 조회해오는 API를 만들어 보도록 하겠습니다.
com.example.demo 패키지 하위에 domain 라는 이름의 패키지를 만들고 해당 패키지에 ContactInfo.java 파일을 생성해줍니다.
그리고 아래와 같은 내용을 넣어줍니다.
import lombok.Getter;
import lombok.Setter;

@Getter
@Setter
public class ContactInfo {
    private String name;
    private String phone;
}
ContactInfo 클래스는 contact 테이블과 연동할 dto입니다.
com.example.demo 패키지 하위에 mapper 라는 이름의 패키지를 만들고 해당 패키지에 ContactInfoMapper.java 파일을 생성해줍니다. ContactInfoMapper는 클래스가 아닌 인터페이스로 생성해주고 아래와 같이 쿼리문을 작성해줍니다.
import com.example.demo.domain.ContactInfo;
import org.apache.ibatis.annotations.*;

import java.util.List;

@Mapper
public interface ContactInfoMapper {

    @Select("select * from contact")
    List<ContactInfo> selectAll();

    @Insert("insert into contact (name, phone) values (#{name}, #{phone})")
    int insert(ContactInfo contactInfo);

    @Delete("delete from contact where name = #{name}")
    int delete(String name);

    @Select("<script>" +
            "select * from contact " +
            "<where>" +
            "<if test=\"name != null and name.length > 0\">and name = #{name}</if>" +
            "<if test=\"phone != null and phone.length > 0\">and phone = #{phone}</if>" +
            "</where>" +
            "</script>")
    List<ContactInfo> selectBy(@Param("name") String name, @Param("phone") String phone);

    @Update("update contact " +
            "set phone = #{phone} " +
            "where name = #{name}")
    int update(String name, String phone);
}
이 ContactInfoMapper 인터페이스는 마이바티스와 연동이 되어 쿼리를 database로 전달하고 결과를 받아오는 역할을 합니다.
com.example.demo 패키지 하위에 service 라는 이름의 패키지를 만들고 해당 패키지에 ContactInfoService.java 파일을 생성해줍니다.
이 파일에는 아래와 같이 내용을 넣어주시면 됩니다.
import java.util.List;

import org.springframework.beans.factory.annotation.Autowired;
import org.springframework.stereotype.Service;

import com.example.demo.domain.ContactInfo;
import com.example.demo.mapper.ContactInfoMapper;

@Service
public class ContactInfoService {

	@Autowired
	private ContactInfoMapper contactInfoMapper;

	public List<ContactInfo> getEveryContactInfo() {
		return contactInfoMapper.selectAll();
	}

	public int addContactInfo(ContactInfo contactInfo) {
		return contactInfoMapper.insert(contactInfo);
	}

	public int delContactInfo(String name) {
		return contactInfoMapper.delete(name);
	}

	public List<ContactInfo> getContactInfos(String name, String phone) {
		return contactInfoMapper.selectBy(name, phone);
	}

	public int updateContactInfo(String name, String phone) {
		return contactInfoMapper.update(name, phone);
	}
}
ContactInfoMapper의 메서드를 호출하는 역할만 하고 있지만 프로젝트가 복잡해지면 각종 비즈니스 로직이 들어가야할 클래스입니다.
조회한 뒤에 정렬을 한다든지, 필터링을 한다든지 하는 로직은 이 서비스 클래스에 넣어주시면 됩니다.
이제 controller쪽에서 사용할 응답 도메인 클래스를 하나 더 만들어 보겠습니다.
com.example.demo.domain 패키지에 Response.java 파일을 생성하고 아래와 같이 작성해줍니다.
import com.fasterxml.jackson.annotation.JsonInclude;
import com.fasterxml.jackson.annotation.JsonInclude.Include;
import lombok.Getter;
import lombok.Setter;

@Getter
@Setter
@JsonInclude(Include.NON_NULL)
public class Response<T> {

    private int code;
    private String message;
    private T data;

    public Response(int code, String message) {
        this.code = code;
        this.message = message;
    }

    public Response(int code, String message, T data) {
        this(code, message);
        this.data = data;
    }
}
마지막으로 com.example.demo 패키지 하위에 controller 라는 이름의 패키지를 만들고 해당 패키지에 ContactInfoController.java 파일을 생성해서 아래 내용을 넣어주세요.
import com.example.demo.domain.ContactInfo;
import com.example.demo.domain.Response;
import com.example.demo.service.ContactInfoService;
import lombok.extern.slf4j.Slf4j;
import org.springframework.beans.factory.annotation.Autowired;
import org.springframework.dao.DuplicateKeyException;
import org.springframework.http.HttpStatus;
import org.springframework.http.ResponseEntity;
import org.springframework.web.bind.annotation.*;

import java.util.List;

@Slf4j
@RestController
@RequestMapping("/contact-info")
public class ContactInfoController {

	@Autowired
	private ContactInfoService contactInfoService;

	@GetMapping("/list") // --> localhost:8080/contact-info/list
	public List<ContactInfo> getAllContactInfo() {
		return contactInfoService.getEveryContactInfo();
	}

	@GetMapping("/get")
	public ResponseEntity<Response> getContactInfos(
			@RequestParam(required = false) String name,
			@RequestParam(required = false) String phone) {
		List<ContactInfo> result = contactInfoService.getContactInfos(name, phone);
		if (result.size() == 0) {
			return ResponseEntity.status(HttpStatus.OK).body(new Response(204, "데이터 없음"));
		}
		return ResponseEntity.ok(new Response(200, "조회 성공", result));
	}

	@PostMapping("/add")
	public ResponseEntity<Response> addNewContactInfo(@RequestBody ContactInfo contactInfo) {
		contactInfoService.addContactInfo(contactInfo);
		return ResponseEntity.ok(new Response(200, "등록 성공"));
	}

	@DeleteMapping("/del")
	public ResponseEntity<Response> delContactInfo(@RequestParam String name) {
		int result = contactInfoService.delContactInfo(name);
		if (result == 0) {
			return ResponseEntity.status(HttpStatus.OK).body(new Response(204, "데이터 없음"));
		}
		return ResponseEntity.ok(new Response(200, "삭제 성공"));
	}

	@PutMapping("/update")
	public ResponseEntity<Response> updateContactInfo(@RequestParam String name, @RequestParam String phone) {
		int result = contactInfoService.updateContactInfo(name, phone);
		if (result == 0) {
			return ResponseEntity.status(HttpStatus.OK).body(new Response(204, "데이터 없음"));
		}
		return ResponseEntity.ok(new Response(200, "수정 성공"));
	}

	@ExceptionHandler
	public ResponseEntity<Response> contactInfoErrorHandler(Exception e) {

		log.error("error!!, {}", e.getClass().getName(), e);

		if (e instanceof DuplicateKeyException) {
			return ResponseEntity.status(HttpStatus.CONFLICT).body(new Response(409, "이미 중복된 이름이 등록되어있습니다."));
		} else {
			return ResponseEntity.status(HttpStatus.INTERNAL_SERVER_ERROR).body(new Response(500, "서버오류가 발생하였습니다."));
		}
	}
}
이 클래스가 프론트와 백엔드를 연결해주는 부분으로 API url을 정의하고 어떤 파라미터들을 전달받아야 하는지, 응답은 어떻게 주고 예외처리는 어떻게 하는지에 대한 내용이 담겨있죠.
이제 백엔드 구현은 완료되었습니다. 아 참!! 하나 빼먹은게 있네요. database 접속 정보를 빼먹었습니다. 자, src/main/resources 하위의 application.properties 파일을 열어서 직접 생성하셨던 database 접속 정보를 아래처럼 넣어주세요.
spring.datasource.url=jdbc:mysql://localhost:8889/javastudy?useSSL=false&serverTimezone=UTC
spring.datasource.username=javastudy
spring.datasource.password=javastudy
spring.datasource.driver-class-name=com.mysql.cj.jdbc.Driver
접속 포트(8889)와 database명(javastudy) 그리고 username, password 정보를 생성하신 데이터베이스에 맞게 변경해주셔야 합니다.
여기까지 완료되었다면 Project Explorer에 아래와 같이 파일들이 존재해야 합니다.

이제 ContactManagerApplication을 Sppring Boot App으로 기동해서 API가 잘 동작하는지 확인을 해보도록 하겠습니다.
앱 기동에 성공하면 Console View에서 아래 로그를 확인 할 수 있습니다.
INFO 69998 --- [main] o.s.b.w.embedded.tomcat.TomcatWebServer  : Tomcat initialized with port(s): 8080 (http)
INFO 69998 --- [main] o.apache.catalina.core.StandardService   : Starting service [Tomcat]
INFO 69998 --- [main] org.apache.catalina.core.StandardEngine  : Starting Servlet engine: [Apache Tomcat/9.0.37]
INFO 69998 --- [main] o.a.c.c.C.[Tomcat].[localhost].[/]       : Initializing Spring embedded WebApplicationContext
INFO 69998 --- [main] w.s.c.ServletWebServerApplicationContext : Root WebApplicationContext: initialization completed in 1185 ms
INFO 69998 --- [main] o.s.s.concurrent.ThreadPoolTaskExecutor  : Initializing ExecutorService 'applicationTaskExecutor'
INFO 69998 --- [main] o.s.b.w.embedded.tomcat.TomcatWebServer  : Tomcat started on port(s): 8080 (http) with context path ''
INFO 69998 --- [main] c.e.demo.ContactManagerApplication       : Started ContactManagerApplication in 2.457 seconds (JVM running for 3.521)
이제 브라우저 창을 열고 http://localhost:8080/contact-info/get 을 주소창에 입력하고 호출해보겠습니다.
아래처럼 출력이 되면 정상적으로 잘 동작한 겁니다.
{"code":204,"message":"데이터 없음"}
여기서 혹시 에러가 난다면 위로 올라가서 다시 순서대로 따라해보세요.
그래도 안되신다면....댓글로 에러메시지를 남겨주시면 함께 고민해보도록 하겠습니다.
자, 이제 프론트 개발로 넘어갑니다.
프론트 개발
프론트 영역 개발을 위해서 pom.xml에 두 개의 dependency를 추가해주겠습니다.
<dependency>
	<groupId>org.webjars</groupId>
	<artifactId>bootstrap</artifactId>
	<version>4.5.0</version>
</dependency>
<dependency>
	<groupId>org.springframework.boot</groupId>
	<artifactId>spring-boot-starter-thymeleaf</artifactId>
</dependency>
thymeleaf와 부트스트랩입니다.
그리고 controller 패키지 내에 ViewController.java 파일을 만들어서 아래와 같이 짧은 코드를 작성해주겠습니다.
import org.springframework.stereotype.Controller;
import org.springframework.web.bind.annotation.GetMapping;

@Controller
public class ViewController {

    @GetMapping("/contact-info")
    public String contactInfo() {
        return "contact-info";	// contact-info.html을 화면에 보여주는 역할
    }

}
그리고 src/main/resources 하위의 templates 디렉토리에 contact-info.html 파일을 하나 생성하고 아래 내용을 넣어주세요.
<!DOCTYPE html>
<html>
<head>
<meta charset="UTF-8">
<!-- JS link -->
<script src="https://ajax.googleapis.com/ajax/libs/jquery/3.5.1/jquery.min.js"></script>
<script src="/webjars/bootstrap/4.5.0/js/bootstrap.min.js"></script>
<script src="script/contact-info.js"></script>
<!-- CSS link -->
<link rel="stylesheet"
href="/webjars/bootstrap/4.5.0/css/bootstrap.min.css"/>
<link rel="stylesheet" href="style/contact-info.css"/>
</head>
<body>
<div id="content">
<h1>연락처 관리</h1>
<p>
<label>이름:</label>
<input id="name" type="text" placeholder="이름" pattern=""/>
<label>연락처:</label>
<input id="phone" type="text" placeholder="010-1234-5678"/>
<button type="button" class="btn btn-primary btn-lg" onclick="addContact()">등록</button>
<button type="button" class="btn btn-danger btn-lg" onclick="delContact()">삭제</button>
</p>
<div>
<button type="button" class="btn btn-info btn-lg" onclick="getContacts()">연락처 목록 조회</button>
<table>
<thead>
<tr>
<th class="name">Name</th>
<th class="phone">Phone</th>
</tr>
</thead>
<tbody id="contact-info-table"></tbody>
</table>
</div>
</div>
<!-- Update Modal -->
<div class="modal fade" id="updateModal" tabindex="-1" role="dialog" aria-labelledby="updateModalLabel"
aria-hidden="true">
<div class="modal-dialog" role="document">
<div class="modal-content">
<div class="modal-header">
<h5 class="modal-title" id="updateModalLabel">연락처 수정</h5>
<button type="button" class="close" data-dismiss="modal" aria-label="Close">
<span aria-hidden="true">×</span>
</button>
</div>
<div class="modal-body">
</div>
<div class="modal-footer">
<button type="button" class="btn btn-secondary" data-dismiss="modal">Close</button>
<button type="button" class="btn btn-primary" onclick="updateContactInfo()">Save changes</button>
</div>
</div>
</div>
</div>
</body>
</html>
그리고 src/main/resources 하위의 static 디렉토리 하위에 style, script 두 개의 디렉토리를 생성해줍니다.
style 디렉토리에는 contact-info.css 파일을 넣을거고, script 디렉토리에는 contact-info.js 파일을 넣을 겁니다.
각 파일의 내용은 다음과 같습니다.
src/main/resources/static/style/contact-info.css
body {background-color: beige;}
th {text-align:center}
.name {width:100px;}
.phone {width:200px;}
#content {margin:100px;}
#contact-info-table tr:hover {background-color: cornflowerblue;}
src/main/resources/static/script/contact-info.js
$( document ).ready(function() {
    getContacts();
});

function addContact() {
    let name = $('#name').val();
    if (!name) {
        alert('"name" is required!');
        return;
    }
    if (!validateName(name)) {
        alert('"name" is invalid! 한글만 입력가능합니다.');
        return;
    }
    let phone = $('#phone').val();
    if (!validatePhone(phone)) {
        alert('"phone number" is invalid!\nvalid format: 000-0000-0000');
        return;
    }

    let contactInfo = new Object();
    contactInfo.name = name;
    contactInfo.phone = phone;

    $.ajax({
        url: 'contact-info/add',
        dataType: 'json',
        type: 'post',
        contentType: 'application/json',
        data: JSON.stringify(contactInfo)
    }).done(function(response) {
        alert(response.message);
        console.log(response);
        $('#name').val('');
        $('#phone').val('');
        getContacts();
    }).fail(function(jqXHR, textStatus, errorThrown) {
        alert(jqXHR.responseText);
        console.log(jqXHR.responseText);
    });
}

function validateName(name) {
    return /^[가-힣]+$/.test(name);
// /^[A-Za-z]+$/
}
function validatePhone(phone){
    return /^\d{2,3}-\d{3,4}-\d{4}$/.test(phone);
}

function delContact() {

    let name = $('#name').val();
    if (!name) {
        alert('"name" is required!');
        return;
    }
    $.ajax({
        url: 'contact-info/del?name=' + name,
        dataType: 'json',
        type: 'delete',
        contentType: 'application/json'
    }).done(function(response) {
        alert(response.message);
        console.log(response);
        $('#name').val('');
        $('#phone').val('');
        getContacts();
    }).fail(function(jqXHR, textStatus, errorThrown) {
        alert(jqXHR.responseText);
        console.log(jqXHR.responseText);
    });
}

function getContacts() {
    let name = $('#name').val();
    let phone = $('#phone').val();

    $.ajax({
        url: 'contact-info/get' + generateQueryParams(name,phone),
        dataType: 'json',
        type: 'get',
        contentType: 'application/json'
    }).done(function(response) {
        printContactInfos(response.data);
    }).fail(function(jqXHR, textStatus, errorThrown) {
        alert(jqXHR.responseText);
        console.log(jqXHR.responseText);
    });
}

function generateQueryParams(name, phone) {
    let params = '';
    if (name || phone) {
        params = '?';
        if (name) {
            params += 'name=' + name;
        }
        if (phone) {
           if (params.length > 1) { params += '&';}
            params += 'phone=' + phone;
        }
    }
    return params;
}

function printContactInfos(contactInfos) {
    let rows = '';
    if (contactInfos) {
        contactInfos.forEach(function (item, index) {
            rows += '<tr onclick="popsUpUpdateModal(this)" ><td class="name">' + item.name
            + '</td><td class="phone">' + item.phone + '</td></tr>';
        });
    } else {
        alert('조회된 데이터가 없습니다.');
    }
    $('#contact-info-table').html(rows);
}
function popsUpUpdateModal(row) {
    let name = $(row).find('.name').text();
    let phone = $(row).find('.phone').text();
    let modalBody = '<input type="text" class="name" value="' + name + '" disabled>'
        + '<input type="text" class="phone" value="' + phone + '">';
    $('#updateModal .modal-body').html(modalBody);
    $('#updateModal').modal('show');
}
function updateContactInfo() {
    let name = $('#updateModal .modal-body .name').val();
    let phone = $('#updateModal .modal-body .phone').val();

    if (!validateName(name)) {
        alert('"name" is invalid! 한글만 입력가능합니다.');
        return;
    }
    if (!validatePhone(phone)) {
        alert('"phone number" is invalid!\nvalid format: 000-0000-0000');
        return;
    }

    $.ajax({
        url: 'contact-info/update' + generateQueryParams(name,phone),
        dataType: 'json',
        type: 'put',
        contentType: 'application/json'
    }).done(function(response) {
        alert(response.message);
        console.log(response);
        getContacts();
        $('#updateModal').modal('hide');
    }).fail(function(jqXHR, textStatus, errorThrown) {
        alert(jqXHR.responseText);
        console.log(jqXHR.responseText);
    });
}
각 파일들 내에서 하는 역할이 뭔지 잘 모르겠다는 분들은 댓글 달아주시면 아는 한도 내에서 답변 달아드릴게요.
포스팅이 너무 길어져서 일일이 설명을 다 추가할 수가 없음을 양해바랍니다.
자, 이렇게 총 4 개의 파일을 추가하는 것만으로 프론트 개발이 완료되었습니다.
이제 다시 애플리케이션을 재기동한 뒤 화면으로 접속해서 기능들을 사용해 보겠습니다.
이번에는 localhost:8080/contact-info 주소로 접속을 하시면 됩니다. 앞에서 사용했던 /get 주소는 API를 직접 호출하는 것이니 빼고 접속해주시면 아래처럼 화면이 뜰겁니다.

이 웹앱에서는 등록시에 이름을 정상적인 한글을 입력해줘야 하고 연락처의 경우 -를 포함하여 자리수를 검증하도록 되어있습니다.
검증은 contact-info.js에서 validateName(), validatePhone() 함수에서 처리하고 있으니 확인해보시기 바랍니다.
오류발생시에는 화면에 오류발생했다고 경고팝업창이 뜨도록 되어있으며, 서버로그를 통해 확인이 가능하도록 되어있습니다.
또한 연락처 수정은 제일 처음에 공유해드린 동영상을 따라해주시면 됩니다.
여기까지 30분만에 연락처 관리 웹앱 만들기 포스팅을 마치도록 하겠습니다.
궁금하신 사항이나 잘 안되시는 분들은 댓글 달아주시면 확인해서 답변드리도록 하겠습니다.
오늘도 즐프하세요~
'💻 Programming > 웹프로그래밍' 카테고리의 다른 글
| [HTML] <fieldset> 태그 (0) | 2020.11.20 |
|---|---|
| Eclipse + SpringBoot + JSP 개발환경 세팅하기 #2 (0) | 2020.07.23 |
| Eclipse + SpringBoot + JSP 개발환경 세팅하기 #1 (3) | 2020.07.22 |
| [MySQL] 데몬프로세스가 자꾸 자동으로 실행되요 (0) | 2020.07.05 |
| [MySQL] auto_increment 컬럼 값은 언제 증가할까 (0) | 2020.07.02 |